You have a question and don't find the answer here? Submit it and we will do our best to answer it!
Hey, you are keen to move on the STC global website and we are excited about it.
Before we can give you the keys to your new website, here are some information that we need in order to set your website up properly:
- Website administrator details
The contact details of your website administrator. Each city can have unlimited editors, which that administrator can set at a later stage, however, we have to set up the first account. - City colour
What colour are you using for your city? If it is not one of the regular colour, please send us a sample. - Contact information
Provide us with the contact information available (email, phone number, office address). - Social Networks
If your city is represented on any social network, please send us the different links to these. - Google Analytics ID
To be able to track visits on your website, please provide us with your Google Analytics ID (it looks like UA-XXXXXXXX-X).
Optional
- Mailchimp API
In order to link the newsletter form to your Mailchimp account, we need to add your Mailchimp API key. This can be done later. - Paypal address
In order for you to receive donation through Paypal, we need you to provide us with the address used for this.
We understand that not every city needs a website in English. Some cities may even need a website in multiple languages. Don’t worry, this is possible.
However, to do that right, we would need you to provide us with some translations first.
You can download the document with the original text to be translated. Please think about keeping the English as you translate, as we may not speak your language and this will help us to do our job.
The translation is already available in:
- Spanish
Here are the main areas of the admin interface.
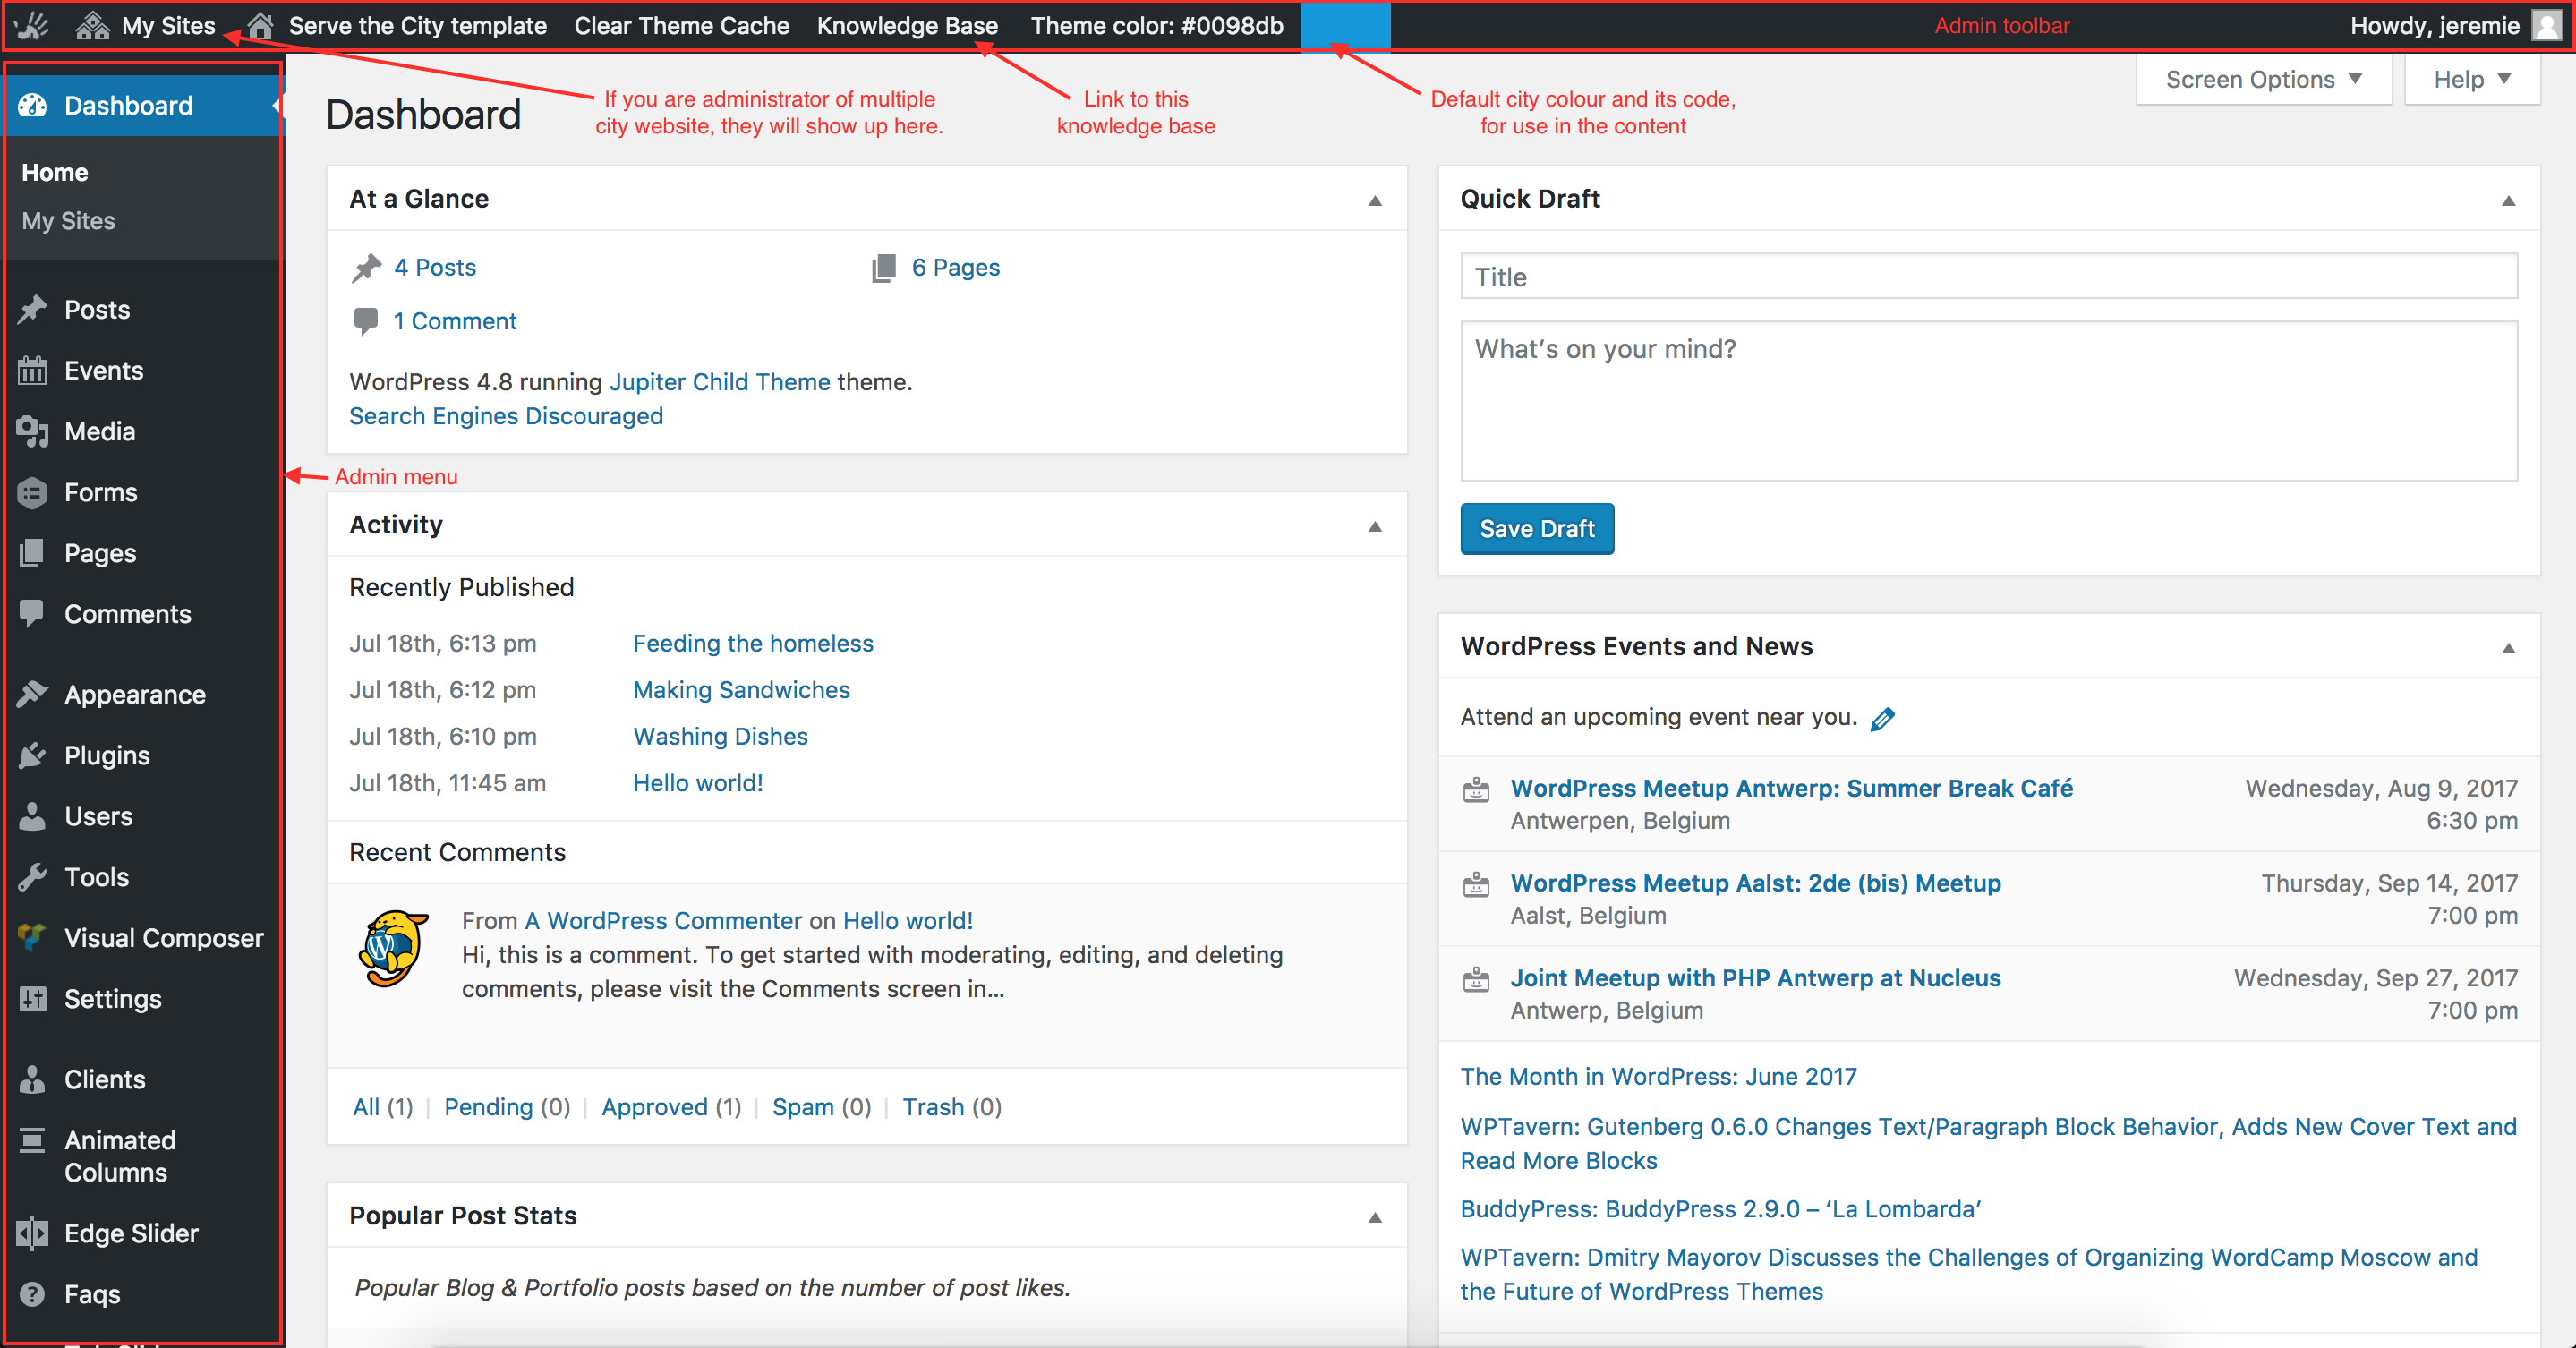
You can control what you see!
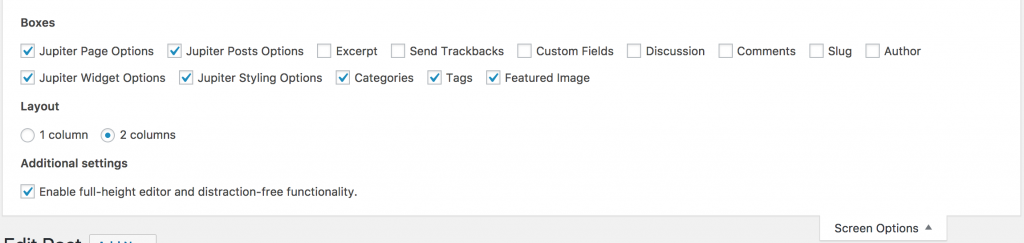
If you are not using / needing some information, on most pages, you can control what will be displayed. To do this, click on the Screen Options button on the top right corner, and check / unckeck the options as needed. Please note that if you do not see an option on your interface, it may be that you need to check there.

You have received your login and after activation, your password? You are ready to dig into your new website. But before we can publish it officially, let’s make sure all the information is correct.
In the email you received with your password, you have received a link ending in wp-login.php. Use it to connect to the admin interface of your site.
You may have noticed that we have filled the site with some dummy data (especially in the News / Volunteer part). Make sure you remove these and add your own content instead.
While most of the other content is generic and valid for all cities, we understand that you may need to personalise it a little bit.
Homepage
- The first row of animated columns may differ from city to city (see: Animated Columns).
- You may only use the news to post short updates, without pictures. If this is the case, let us know and we will find the appropriate presentation for you.
- You may or may not work with Partners & Sponsors, in which case you would need to remove / edit this part (see: Clients).
About
- Cities may focus on specific groups of people. We included 10.
Volunteer
- By default, the volunteer page will display all upcoming events. You may want to have a different structure.
News
- While we know people’s attention is more easily caught with images / videos, we understand that not every city will have the resources to write long news stories with compelling visuals (btw, Unsplash is a royalty free source of pictures where you may find happiness). If this is your case, as mentioned above, let us know and we will find the best presentation for your needs.
Contact
- Not every city is at the same stage. Some have a fixed office, some don’t. By default we preferred to give the more options and scale down when needed than going the other way. Feel free to remove the information that is not relevant here.
Donate
- If you do not have one yet, we encourage you to open a Paypal account and a bank account, to be able to receive donations. However, we are not aware of every country’s legislation on this matter so please check this.
- If you gave us your Paypal address, we have already integrated the form to Paypal, and donations made via this form will arrive straight to your Paypal account. However, if you have not, you will need to set up the Paypal feed (see: Forms > Paypal feed).
- You will also want to change the bank information so they are relevant for yourself.
What else?
- Maybe this is all you need, or maybe you have some specific content you would like to show. If this is the case, create new pages (see: Manage Pages), and add them to the navigation menu (see: Navigation Menu).
Hold on!
We have just a couple more things to do.
Search Engines
First, let’s make your website accessible for search engines. Go to Settings > Reading and make sure the box to discourage bots is not checked.

Domain name
Right now, your website is accessible through the url www.servethecity.net/cityname/ or similar. If you had a website before, you already had a domain name, which you would probably want to keep. If not, you may want to consider the purchase of one.
In general, the recommendation for the domain name format is stccityname.tld. tld stands for top-level domain. In a lot of cases, this would be a .com, .co.uk, .nl, .be, etc… (e.g. stcmadrid.com, stcdenhaag.nl).
However, for a couple of years now, some extensions are available for cities (.nyc, .brussels, .berlin, …). In the case of this being available for your city, we would encourage you to purchase such a domain name in the form of servethecity.cityname (e.g. servethecity.berlin). While in most cases, they are currently more expensive than a .com, they are showing a stronger attachment to the city itself, but also have a higher result locally on search engines like Google.
You have your domain, how do you link it?
This happens in 2 steps.
- Modify the A field in the domain’s DNS records to point to the following IP address: 93.88.255.191. (For help on this matter, you may need to contact your service provide).
- Modify or add the SPF field in the domain’s DNS records to the following: v=spf1 include:spf.protection.outlook.com include:spf.infomaniak.ch -all
- Let us know about the domain name so that we can configure things on our side.
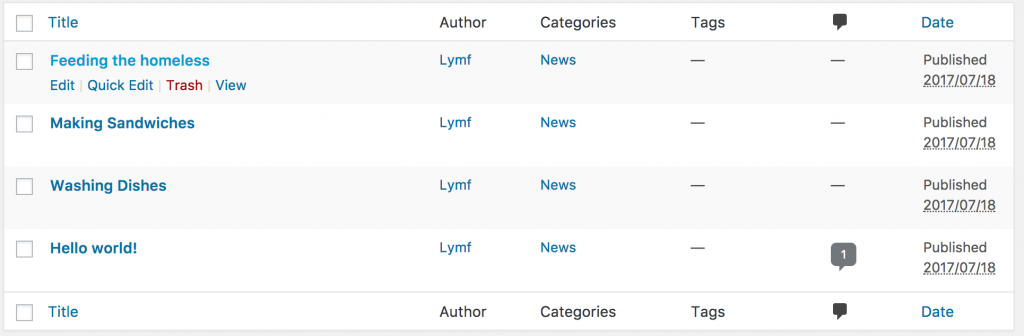
Your news / articles / stories will be referred to as “Posts”.
Add Post
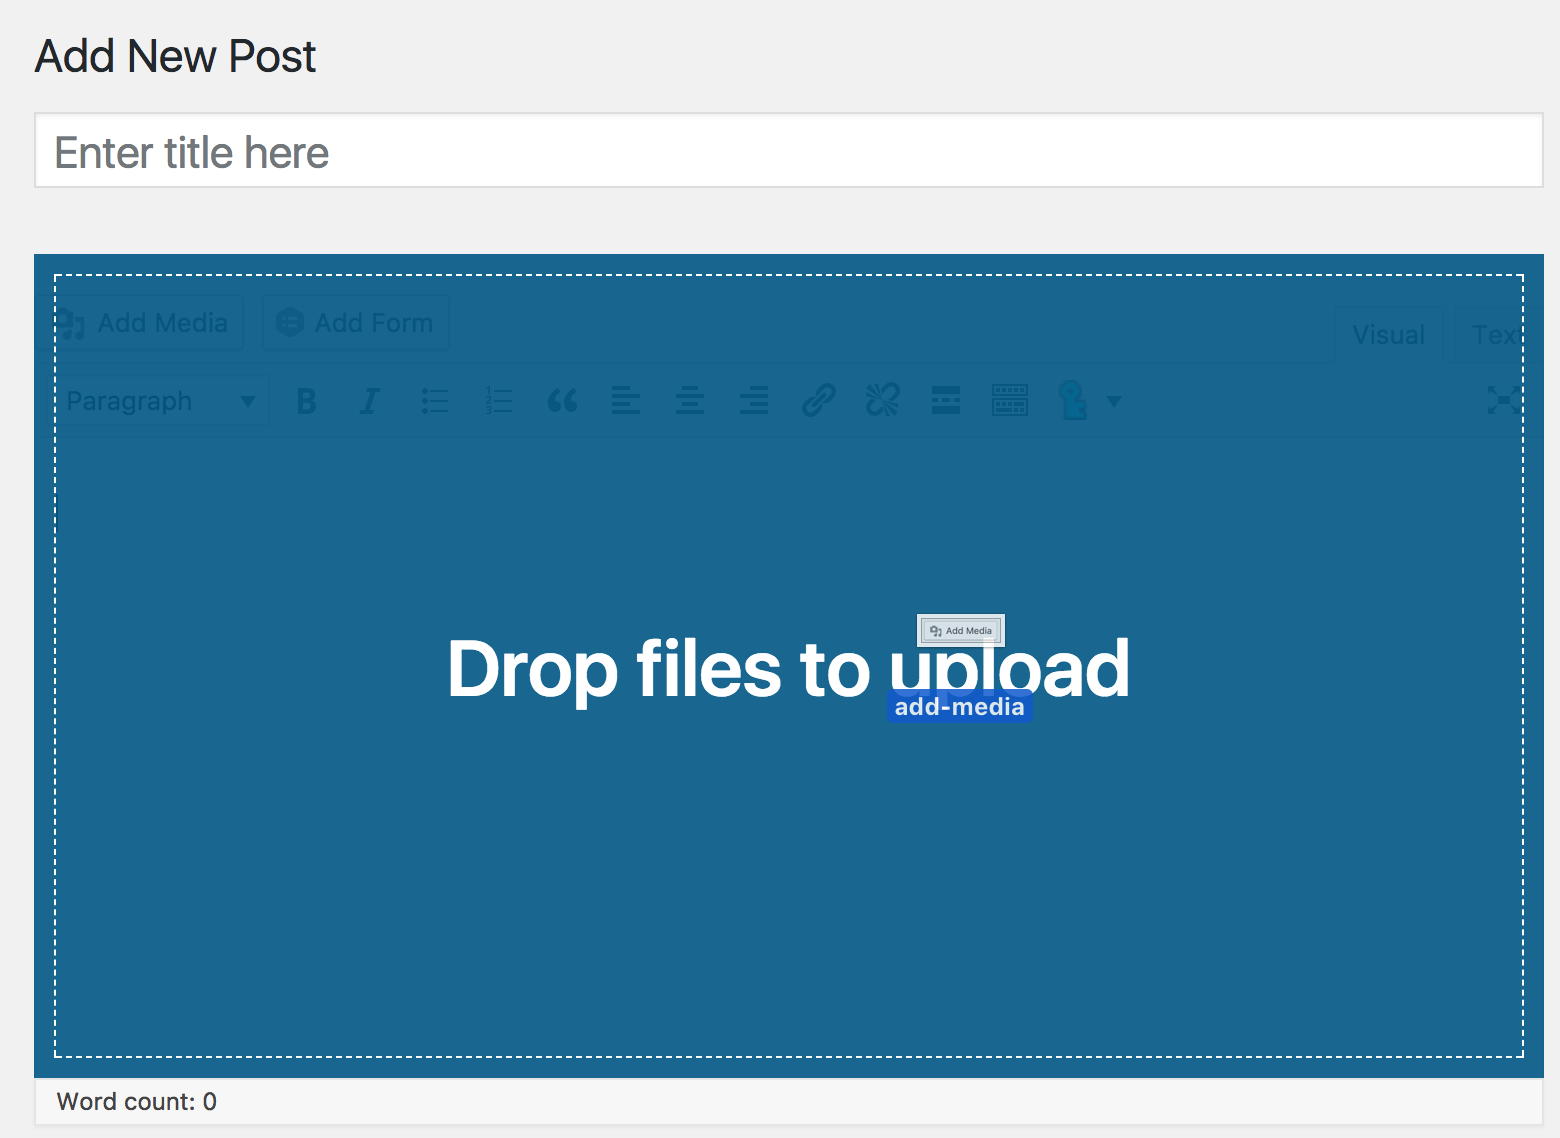
To add a post, click on the “Add New” link, then fill the different fields.
Simply type / paste your title and content in the ad hoc fields. You can also insert images / files in the content. To do so, either click on the “Add Media” button above the field and follow the instructions or drag and drop the file from your computer right over the content field.
![]()
Categories & tags
By default, the post will be added to the News category, unless you decide to add it to another one (which you will have to create).
Categories are hierarchical. This means they can have parents and children. A good use of categories would be for example “News”, “Story”, “Press release”.
You can also add tags to posts. A tag is similar to a keyword, a topic. This is optional but an example would be for example “Refugees”, “Project day”, …
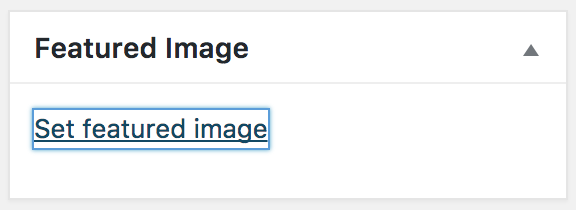
Featured image
You can add a featured image to the post. This image will be used on the front end to illustrate the article.
To do so, click on the Featured Image link, and select / upload the image you would like to use.
Publishing
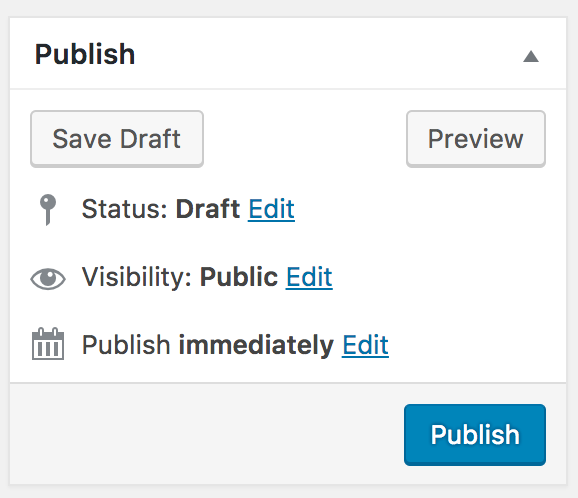
To publish a post, simply click on the publish button.
You can if you want preview the post before publishing, or save it to publish later. You can also modify the date at which the post is published.
Note: If you are setting a date in the future, your post will only be visible when the date is passed (e.g. A post with a publishing date for the 1st January 2029 at 1pm will only be visible after the 1st of January 2029 1pm. This allows you to plan news releases in advance if you are away at the moment you would like it to go online).
Edit post
To edit a post, simply click on Edit while hovering the post.
Events are activity that you organise and that will take place at a specific date and time, such as a Serving Day, a specific project, a fundraiser, or a training. These are referred to as Events in the Admin Interface.
To make it simple, Events are advanced posts. Meaning that pretty much everything that you learned on how to manage posts is true here, with a few additions.
Here is what changes. Events :
- do not have tags
- have a starting date and time and optional ending date and time.
- can have a location
- can have a form attached to them
- can be marked as full
Note: if you do not see the Events menu, you may need to activate the Event Manager extension (see Advance – Manage extensions).
Date and time
Events are usually happening on one day only. However, in some cases, events could be happening on multiple days, such as a weekend or a week.
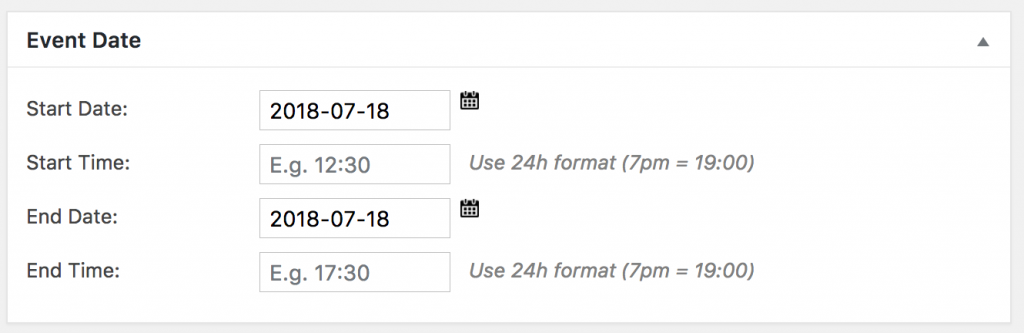
It is required that you select a starting date. By default, the ending date will be the same. Starting and ending time are optional.
Location
If you wish to link your event to a specific location, you may do so by selecting the location in the dropdown menu.

If the location does not exist yet, finish editing your event, save it, and go to Events > Locations in the admin menu. There, add a new location.
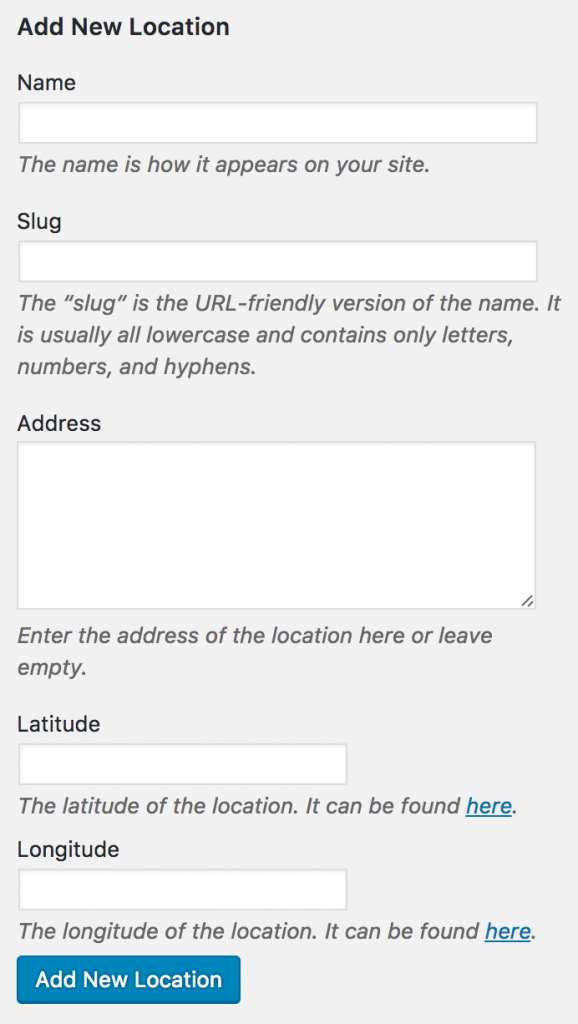
- The slug is optional (it is generated automatically based on the location name).
- The latitude and longitude will allow the website to display a Google Map on the event page.
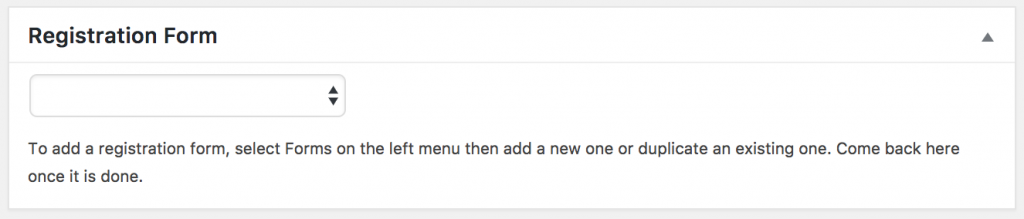
Registration Form
If you are using the built-in form system (rather than SalesForce or any other solution), you can select the form to attach to this event. If you do not have a form for this event yet, you can skip this step and come back to it at a later stage.
Event full?
In case your event is full, you can simply check the box there. It will disable the display of the registration form, as well as visually mark the event as full on the list of events.
If you are using the built-in form system, and have set a limit of registrations to that form, this box will check itself automatically once the limit has been reached.
By default, WordPress will create a URL (web page address) for your page or subpage. This URL will be based on the title of the page, but in a browser friendly language.
E.g.: Your page About Serve the City will by default have the URL www.stcdomainname.tld/about-serve-the-city/.
You might want to change this for different reasons… (the page title changed, the url is too long for your taste, …). In our example, we want the page to have the URL www.stcdomainname.tld/about/ because we think it is better.
To do so, press on the button “Edit” just under the title, next to the permalink.
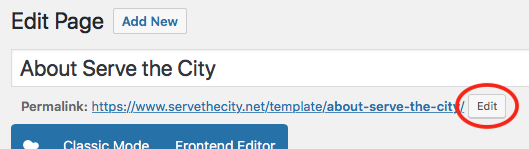
Change the URL to what you would like (in our case, “about”).
![]()
And don’t forget to click “OK” and to UPDATE the page for the change to take effect.
Please note that you can only modify the part of the URL that belongs to the page. If your page has a parent page (e.g. /volunteer/montly-events/, in this case, volunteer is the parent page, monthly-events the child page), you will need to modify the parent page’s URL to modify this part.
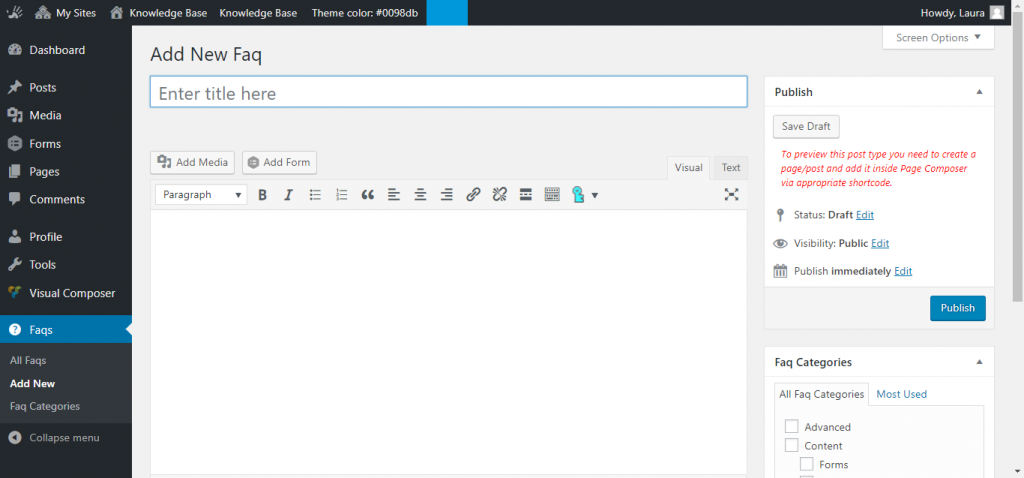
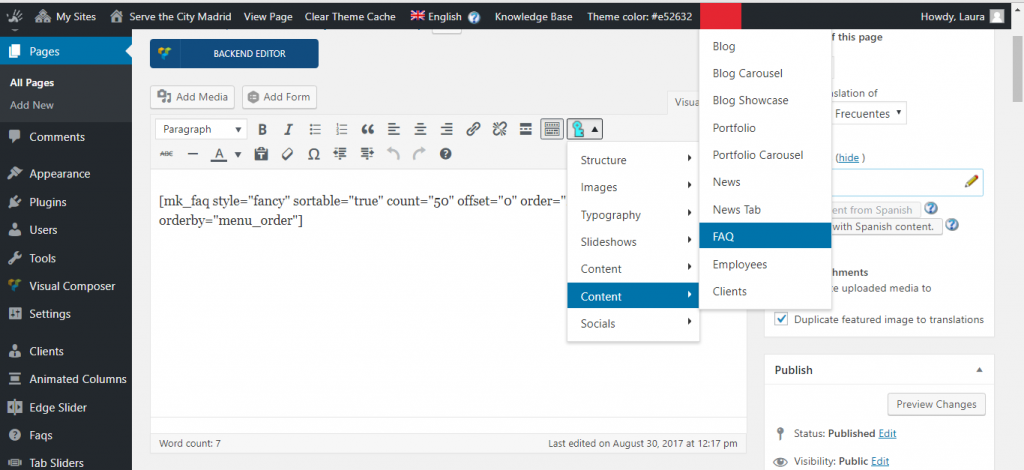
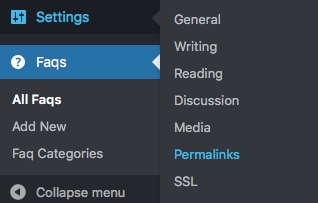
Go to the Dashboard and look for the Faqs manager, and click on Add new.
Add your question in the Title box and then the answer below in the bigger comment box. Once you’re done, click on Publish.
Once, you’re done adding all the questions you want, you can create a new Page for your FAQs.
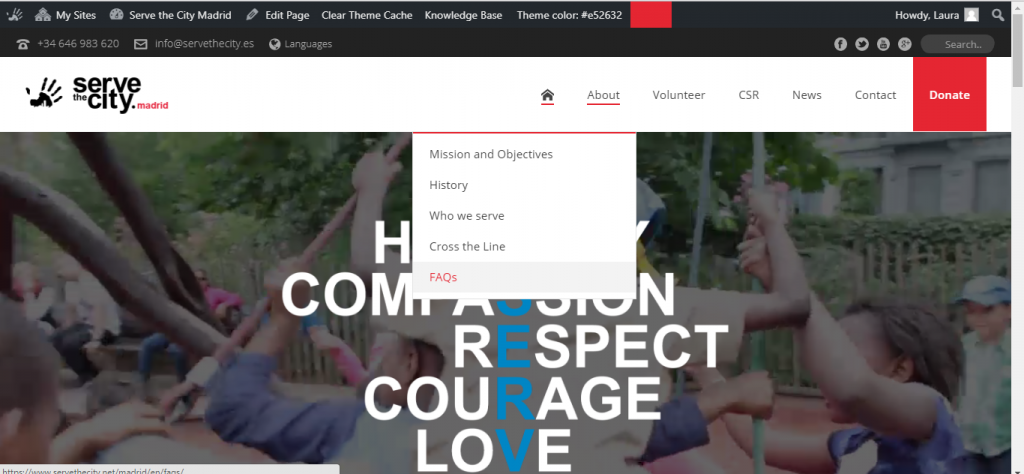
In the text area, click on the the Insert Shortcode button.

Choose Content > FAQ and the shortcode will appear in the text box. Click Publish and the FAQs you had previously added in the FAQ manager will appear on the page.
By default, there are 3 forms on your website.
- Donate online
- Newsletter
- Registration form template
If you provided us with the PayPal Account and Mailchimp API, you probably don’t have to ever touch the 2 first forms. If you are using the built-in form system, you will be using the Registration Form template.
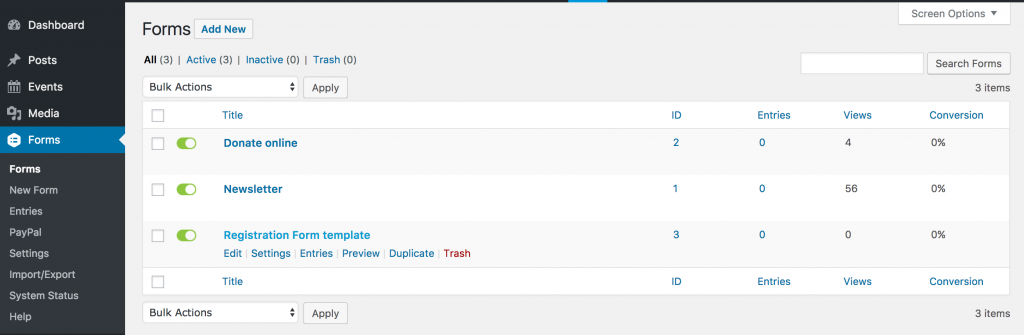
We recommend you to look at the Registration Form template and to adapt it to your needs (fields, confirmation emails, …) and to duplicate it for your future events.
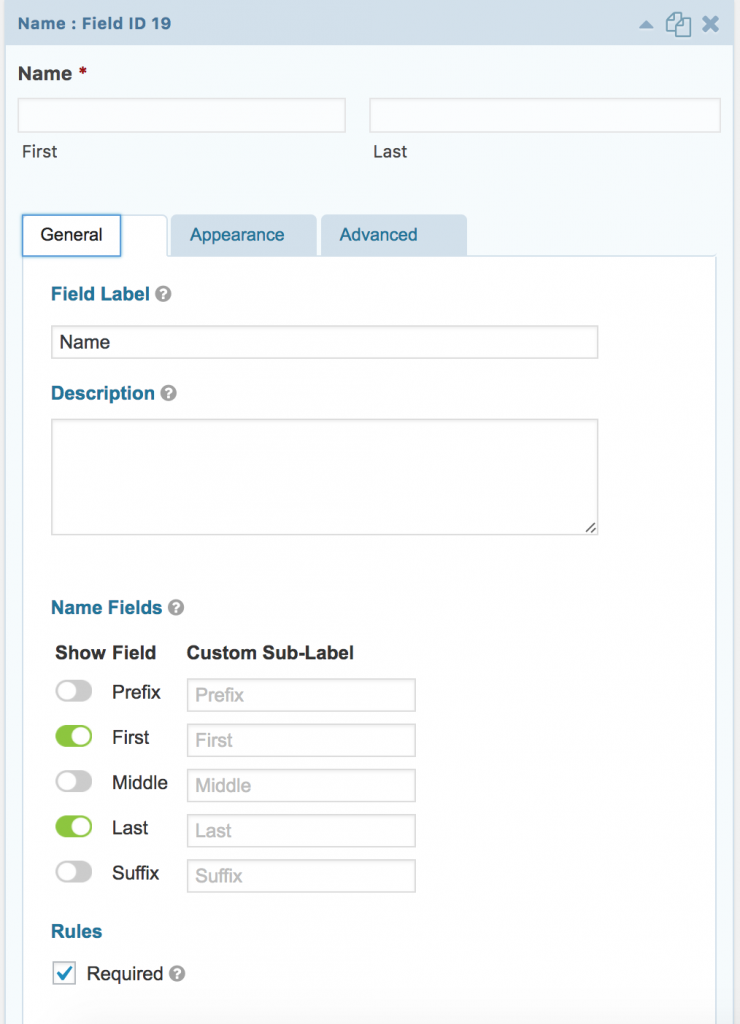
This is the interface to edit the fields of a form.
On the left side is the form in its current state, on the right side different boxes with different types of fields.
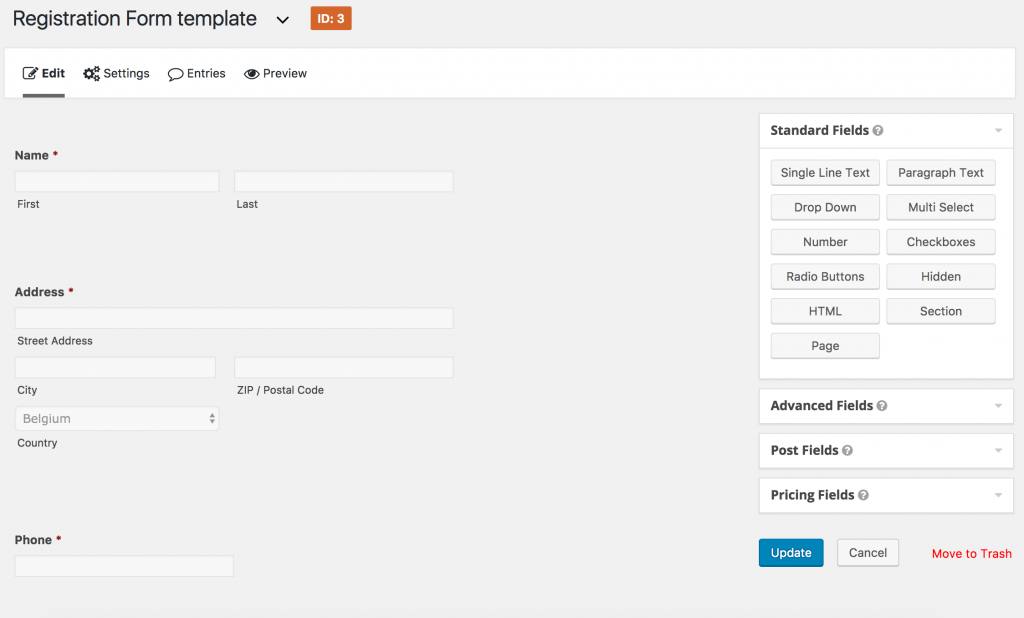
To add a field, click on the appropriate button on the right side, the field will be added to the form (at the bottom). Make sure to check the Advanced Fields section which contains some premade fields for name, email, …
To reorder the fields, simply move the mouse over the name of the field, then drag ‘n’ drop at the desired place.

Simply clicking the name of the field will display additional options for the field.
To have more information, please read Gravity Forms’ documentation.
While editing a form, you have the possibility to edit its settings.
Here are the different settings you can define:
- Form title
- Form description
- Form layout
- Label placement
- Description placement
- Sub-label placement
- CSS class name (for advance styling)
- Form button
- Text or Image
- Is there a conditional logic for it to appear (this is not advised)
- Enable Save and Continue or not
- Restrictions
- Limit the number of entries
- Schedule the time during which the form is available
- Require users to be logged in
- Options
- Enable anti-spam
- Enable animations
Mainly, you will play with the title, description, button and restrictions.
To have more information, please read Gravity Forms’ documentation.
By default, the confirmation message displayed once submitted is a text that can be modified in the form’s Settings > Confirmations.
This text can be modified, or replaced by a redirection to a page of the website, or to an external page
![]()
The confirmation message can be advanced, using data submitted by the visitor.
In some cases, you may need multiple confirmation messages, which would need to be displayed depending on what the person has filled in. For example, if you have a registration fee for an event, and offer payment via Paypal or Bank Transfer, you may want to have a confirmation that shows the bank information when the person select a payment via Bank Transfer, but which thanks the person for the payment if it has been done via Paypal (and therefore has already been paid by the time the person gets this message).
This can be done by adding conditional logic to the confirmation (conditional logic works the same way as in other places).

To have more information, please read Gravity Forms’ documentation.
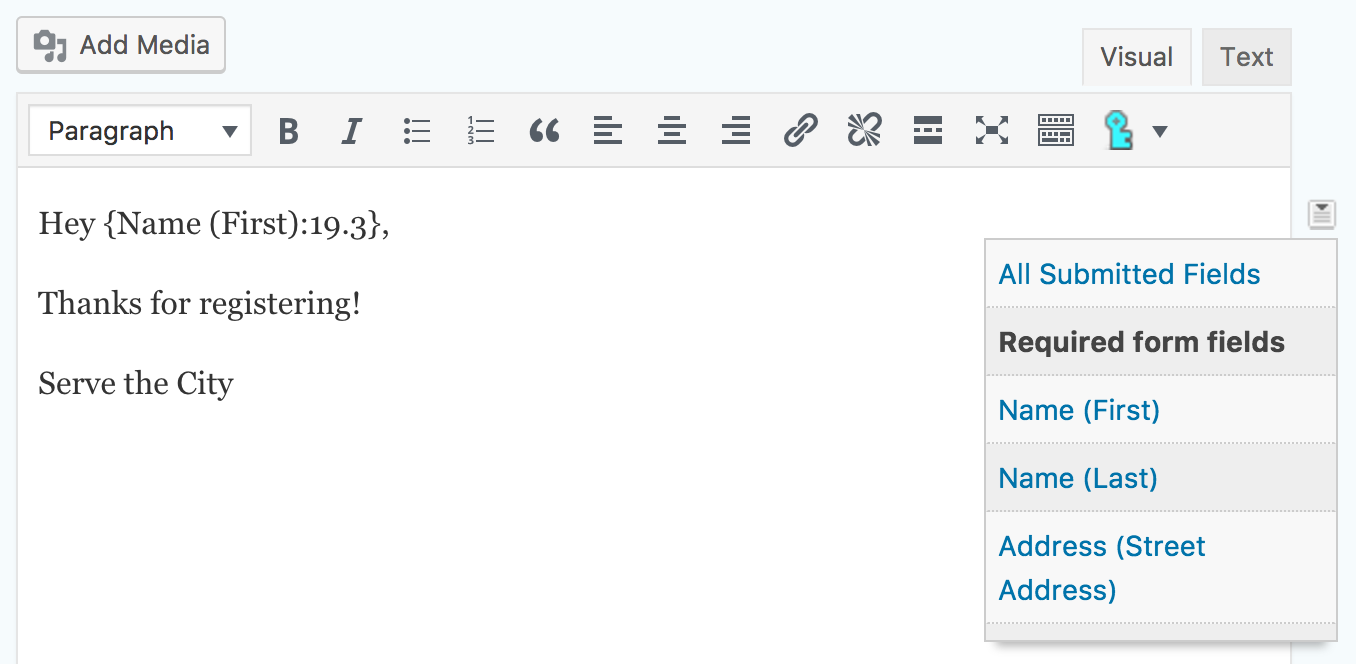
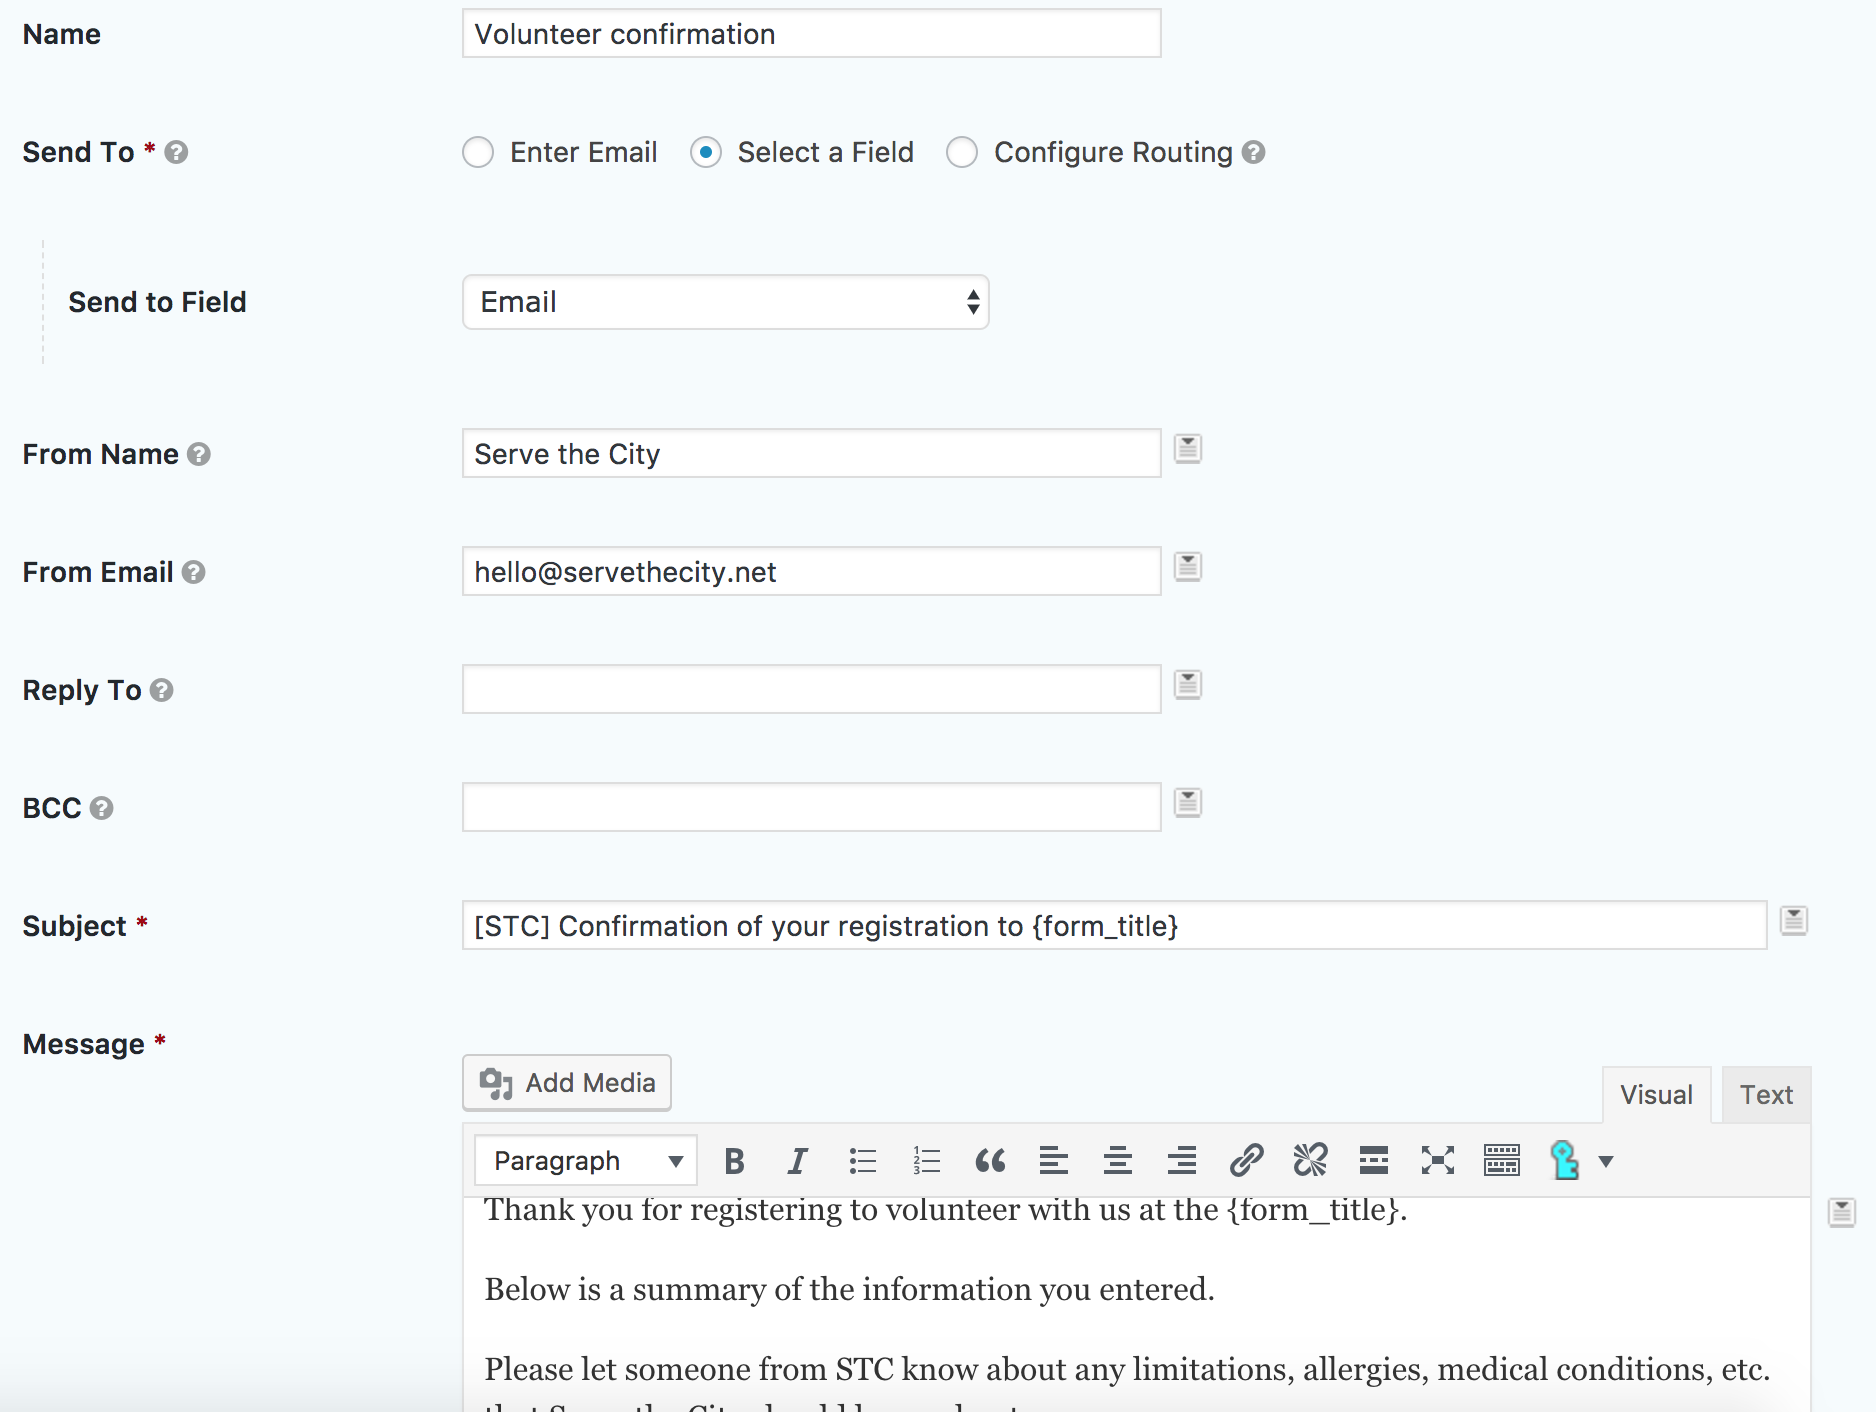
By default, a notification email is sent to the site administrator. However, in a lot of cases, the site administrator is not the person in charge of handling form submissions.
In the Registration Form template, we created as well a Volunteer confirmation.
You may need different type of confirmations depending of your events / activities…
As for the confirmation, it is possible to insert data submitted by the user in the email, as well as use conditional logic to decide when to use this email notification.
To have more information, please read Gravity Forms’ documentation.
The built-in form system allows you to export the data as a CSV file.
To do so, go to Forms > Import/Export > Export Entries and select the form for which you would like to download the CSV.
You can then select the specific fields you would like to export (or all), add a conditional logic if needed (for example export only people named John), and if you want, add a time range for the entries (e.g. only last week’s entries).
To have more information, please read Gravity Forms’ documentation.
As you may already be aware by now, your website allows your visitors to register to you Mailchimp newsletter.
If you have provided us with your Mailchimp API key at the beginning, then the newsletter form is already linked.
If not, you need to do the following:

- Go to Forms
- Go to Forms > Settings
- Go to Forms > Settings > MailChimp
- Enter your API key (if you do not have a Mailchimp API key, check Advanced > How to get my MailChimp API Key)
- Update Settings
Once this is done, you still need to link the specific form to Mailchimp.
To do so, select the Newsletter form (or any other form you would like to link to MailChimp) by going to Forms > Forms > Newsletter > (while your mouse is over) Settings > Mailchimp
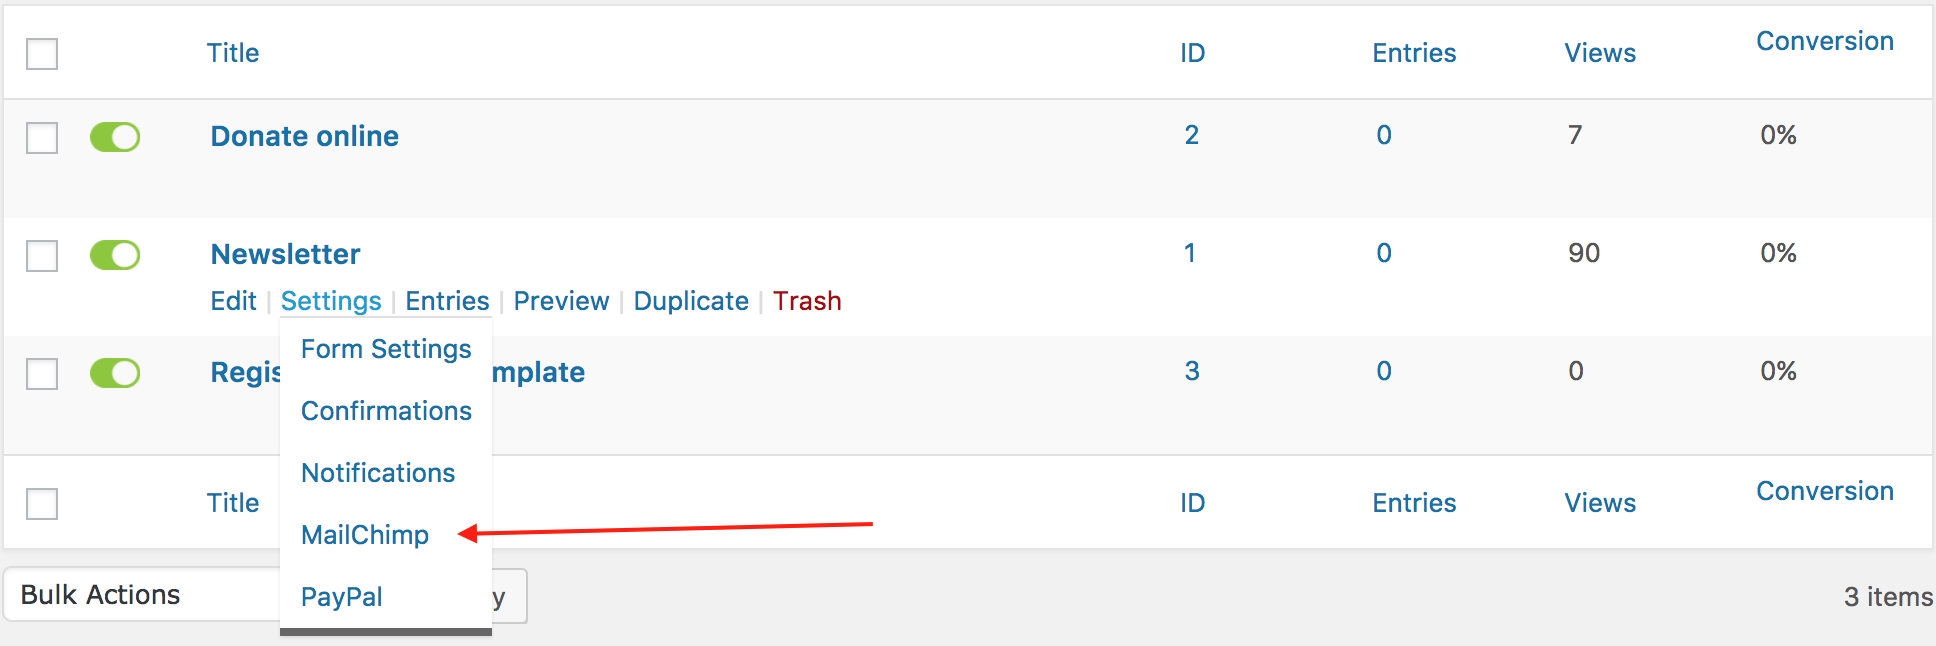
Normally, you won’t have any MailChimp Feed and need to create a new one.

Doing this, if your MailChimp account is properly configured, you will see a dropdown menu with the list of Newsletter lists that you have on MailChimp.
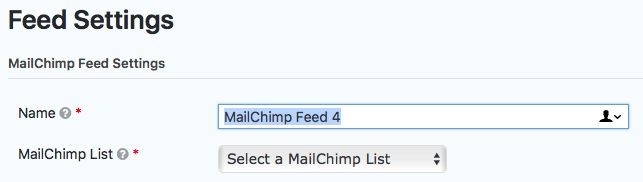
Once you select the list, just map the fields that need to be mapped, update the settings and you are done. The fields to be mapped may differ depending on how you configure your MailChimp list (on the MailChimp side that is).
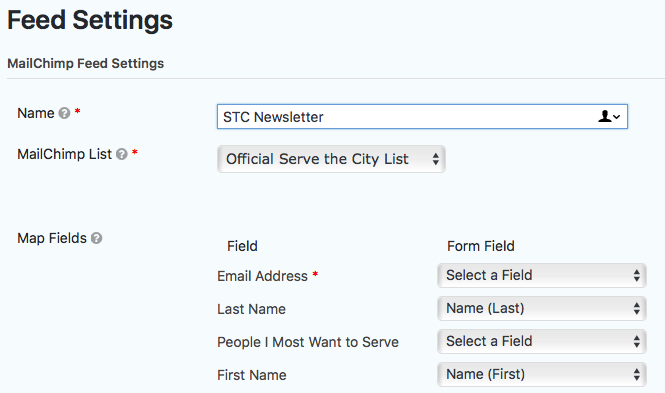
Note: once you configured Gravity Forms for MailChimp, you will only need to configure the Feed for all future forms you want to link to MailChimp.
Is it possible to set a maximum amount of sign-ups for an event and block further signing-up when this maximum is reached?
Yes.
In the Forms’ Settings, you have the possibility to define a lot of options, including the maximum number of entries (signups).
Go to your form’s Setting page and scroll to the restrictions. Check the Limit number of entries check box and set your preferences, then save the options by updating the form settings.
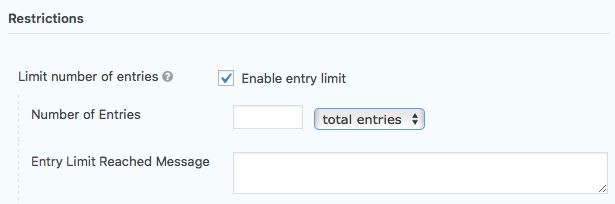
Once the limit will be reached, the form will automatically stop being displayed, and it will update the event itself to mark it as full (which will add a “Full” banner on the thumbnail).
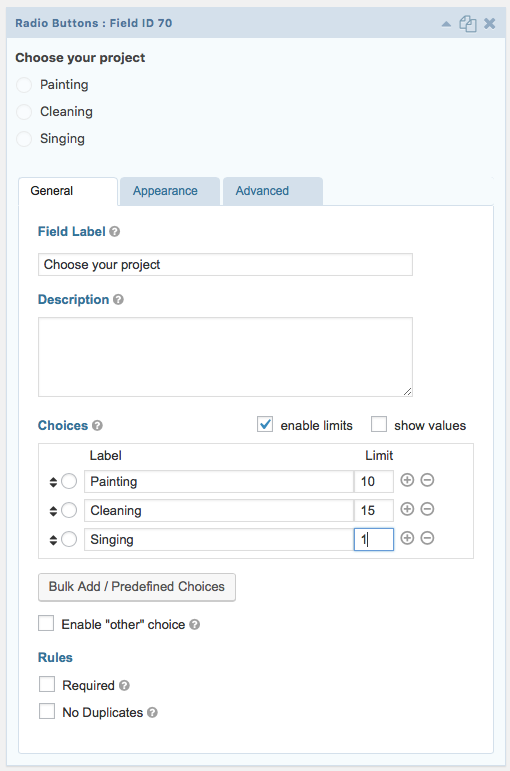
In the case of a unique form where people choose their project and the limit needs to be managed for that specific multi option field, you will need to do the following:
- First, go to Plugins and activate the “GP Limit Choices” plugin.

- Once this is done, go to your form, and to the project selection field, check the “enable limits” checkbox and fill the limits as you need to, then save the form.


Furthermore can this counter be made visible on the site (and if so: how?)?
Unfortunately, at this stage, it is only possible to show if a project / event is full.
Yes and no.
A form can be translated in its entirety, including the confirmation messages and emails, however the method is slightly different than for the Pages and Posts.
First, get the ID of the form you would like to translate (you can get it for example on the form editing page).
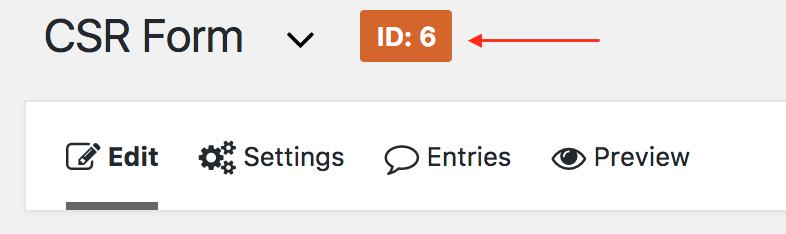
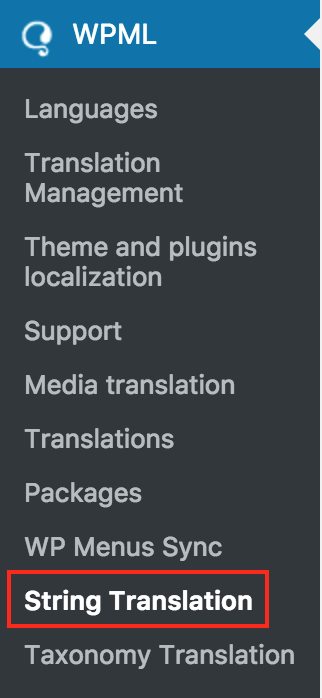
Now, head to WPML > String Translation (at the bottom of the left navigation).
Once there, at the top of the page, in the dropdown menu “Select string within domain”, select gravity_form-x where x is the ID of your form, in our example 6.

For each string that needs translation, click on translation, enter the translated text in the field, mark it as complete and save.
![]()
Note: Usually, you do not need to translate the fields xxxxx-value. These are in the case of a multiple choice / radio button field, and is the value sent to the admin, not the one displayed.
Pages are meant to hold the “static” content of your site. For example, the contact page, about page, etc… Pages are also the elements that will “host” the module displaying your news and events. Pages are essentially Posts without categories etc…
In Classic mode, editing pages is essentially like editing a page.
However, in Backend Editor (Visual Composer), the interface is quite different, allowing you to build complex designed pages. ![]()
To know more about the Visual Composer mode, please read Content > Visual Composer.
Yes!
If your website is multilingual, then the forms can be multilingual too. So are the confirmation texts.
To translate the confirmation texts, simply follow the instructions on this FAQ item. Find the string for the confirmation message and translate it.
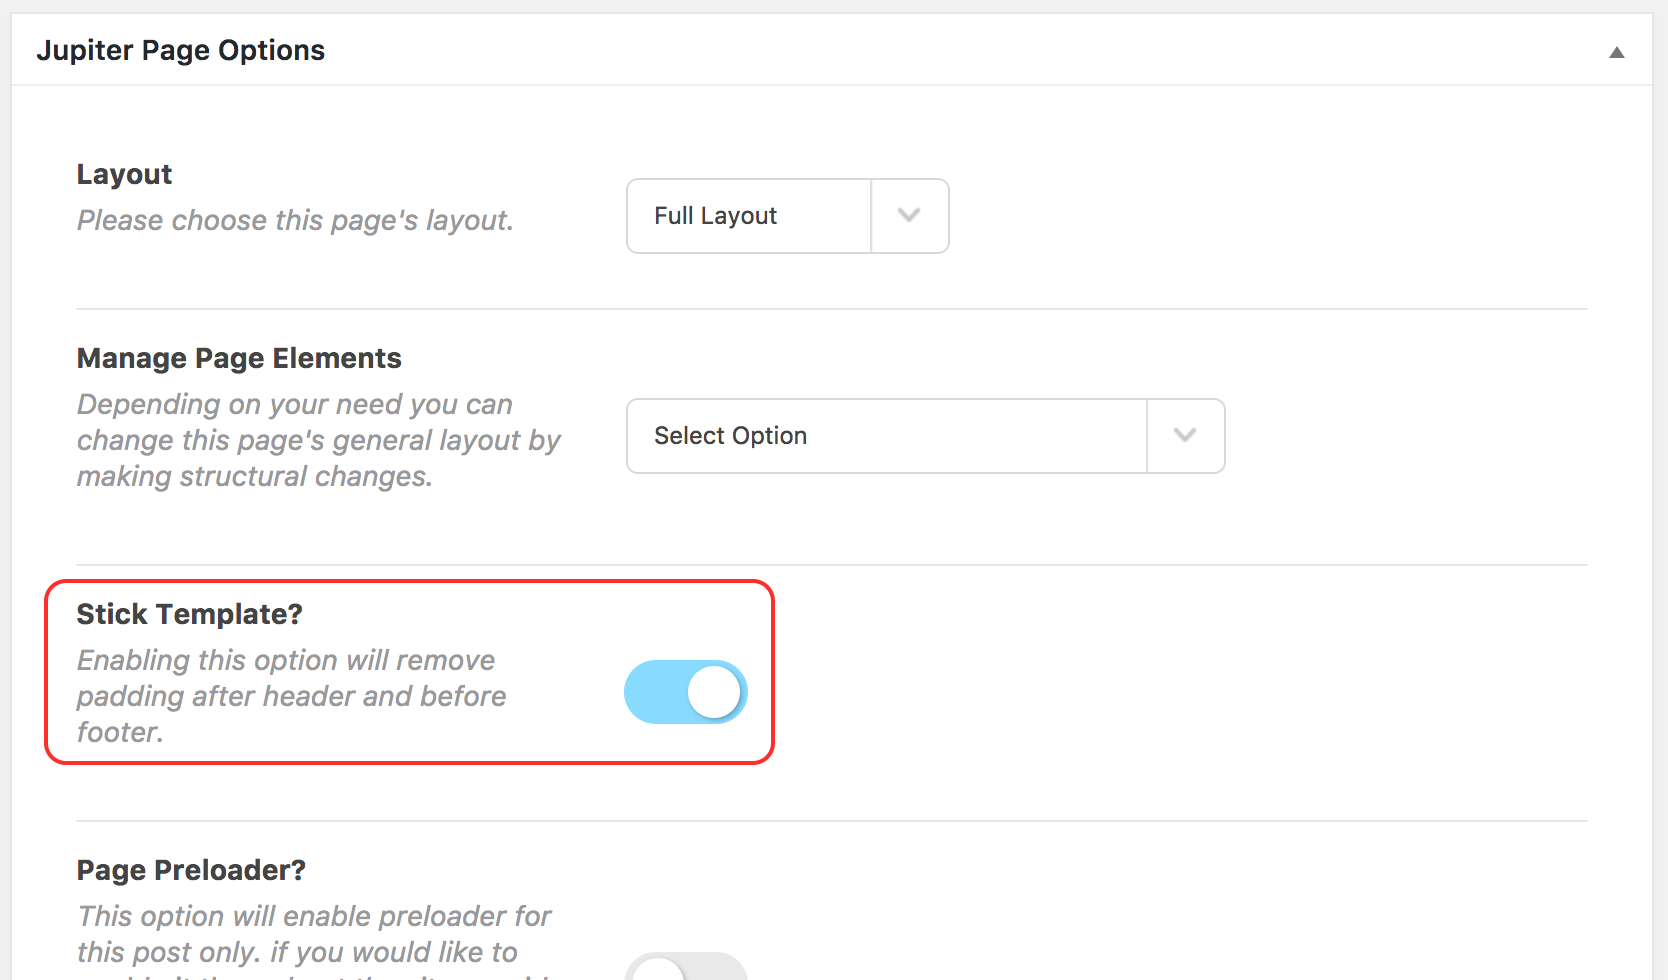
By default, pages have a space between the title and the content.

It is possible to remove the space when needed by simply changing the Stick Template option in the Jupiter Page Options (bottom of the page).
Visual Composer is a powerful editing tool for WordPress, allowing you to create complex layouts.
To simplify, Visual Composer (VC) works with rows, columns, and content blocks.
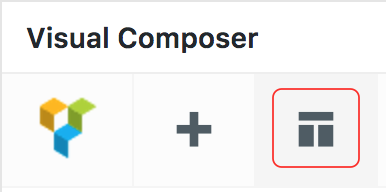
Starting with a blank page, you have the possibility to add an element (block), a shortcut to the basic text block, or load a template (See Visual Composer – Templates). There is also a link to the knowledge base of Visual Composer, which is more detailed than the present one on this specific matter.
![]()
Once you decide to add an element, you will have multitude of options. It is impossible for us to explain how each of these options are working. We advise you to try them on a test page to see how they work.
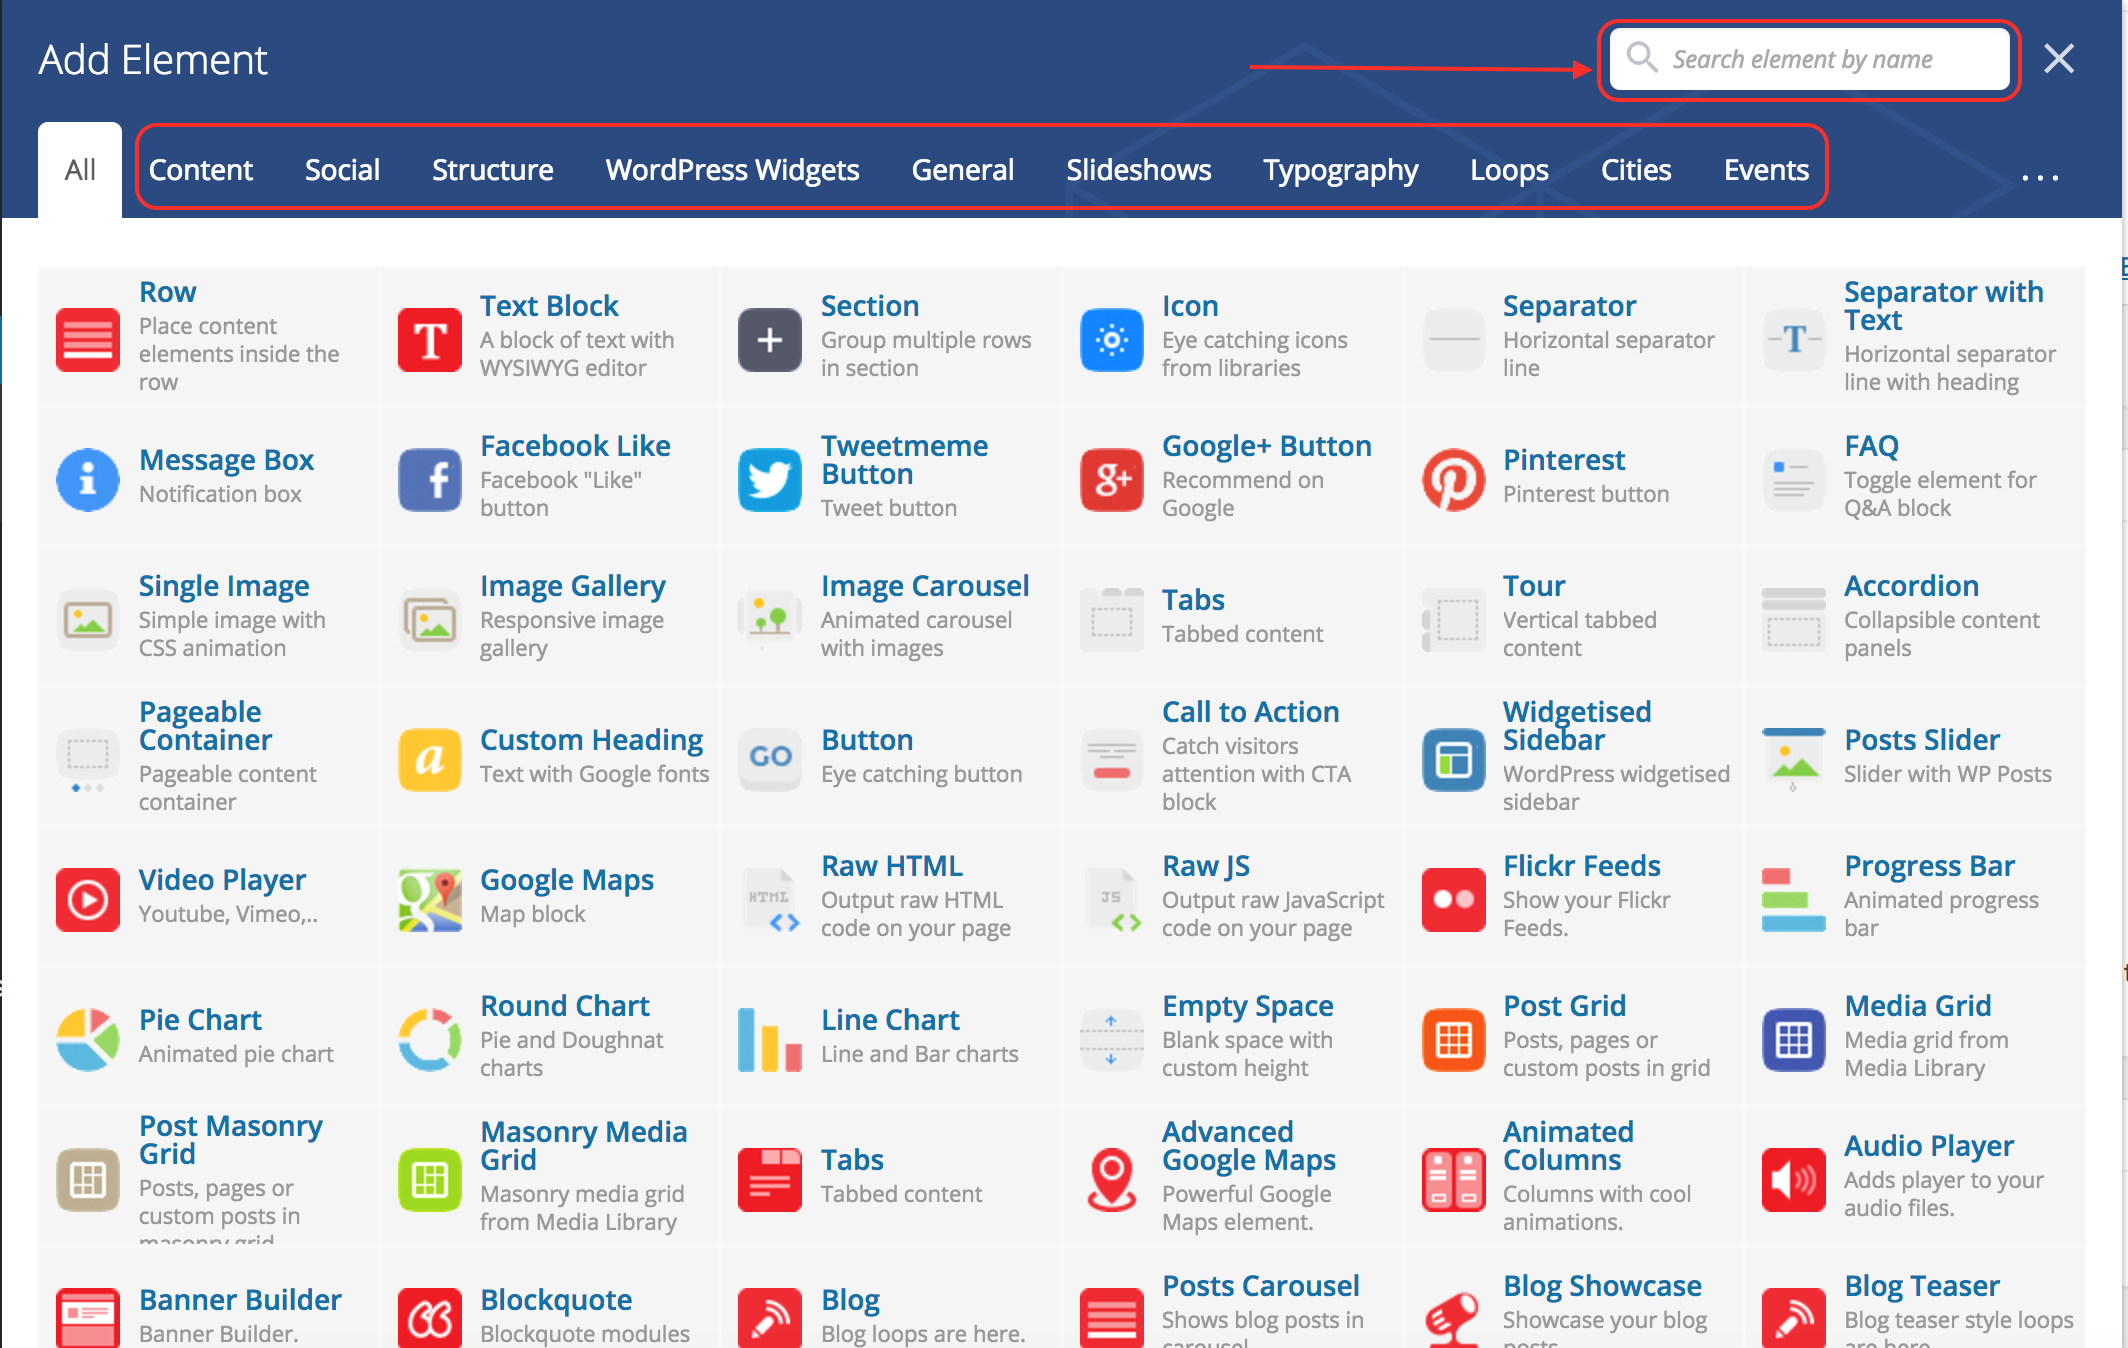
You have the possibility to search for a specific content block, or to browse them by categories.
Here are a few of the content blocks available:
- Row
A row is by default added if you add a content block out of a container (row / page section). It can be divided in columns. - Text block
A text block is the default content block, it is basically the same as the content editor in the Classic Mode. - Tabs
Allows to create tabbed content. - Accordion
Allows to create content that displays like an accordion. - Buttons
- Google Maps and Advanced Google Maps
Allows to insert a Google Map in the page. - Raw HTML
Allows you to add plain and simple HTML code. - Blog
Allows to display Posts with different options. - Clients
Allows you to display the logos of your partners. - Fancy title
Allows you to add a title with a lot of options. - Gravity Forms
Allows you to insert a form. - Cities Map
Displays a map of the different cities (useful for a national website). - Cities Listing
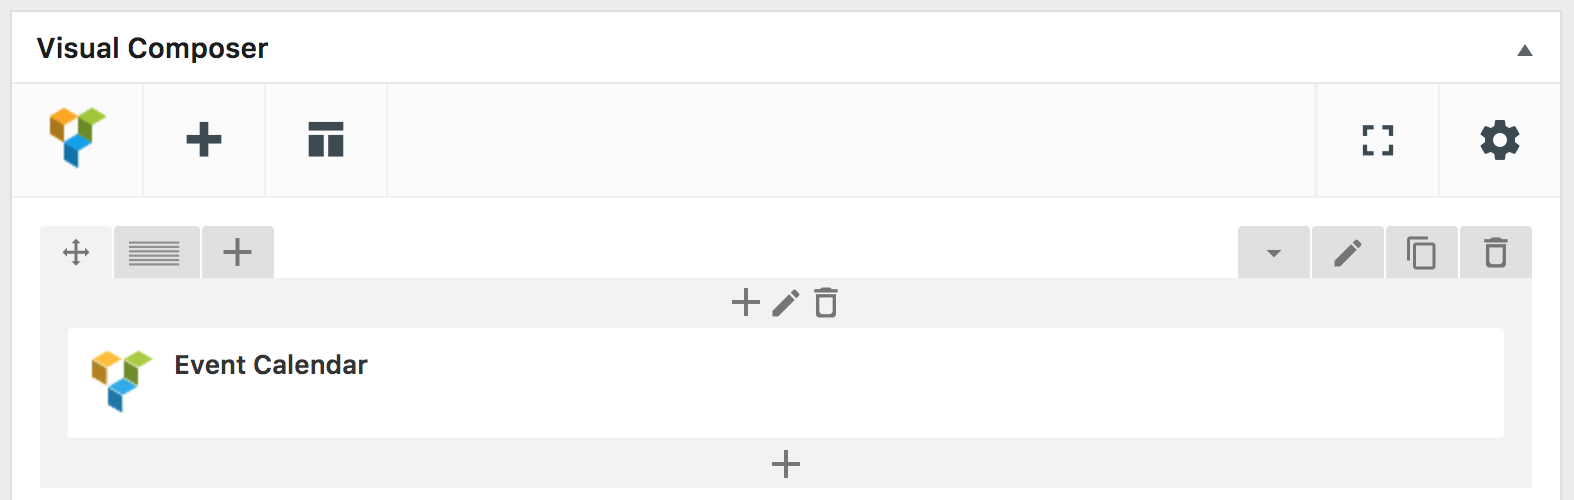
Displays a fancy list of cities (useful for a national website). - Event Calendar
Displays the list of upcoming events on your website.
In Visual Composer language, a template is a page layout that you save to reuse later.
To save a page layout as a template, edit the page you would like to save. Click on the Template Button, type a name and save.
To load a template, create a new page, click on the Template button and load the desired template.
In Visual Composer, the content is organised in rows and columns.
To create rows, you can either use the Row or the Page Section block. The Page Section is basically an advanced Row, with more possibilities.

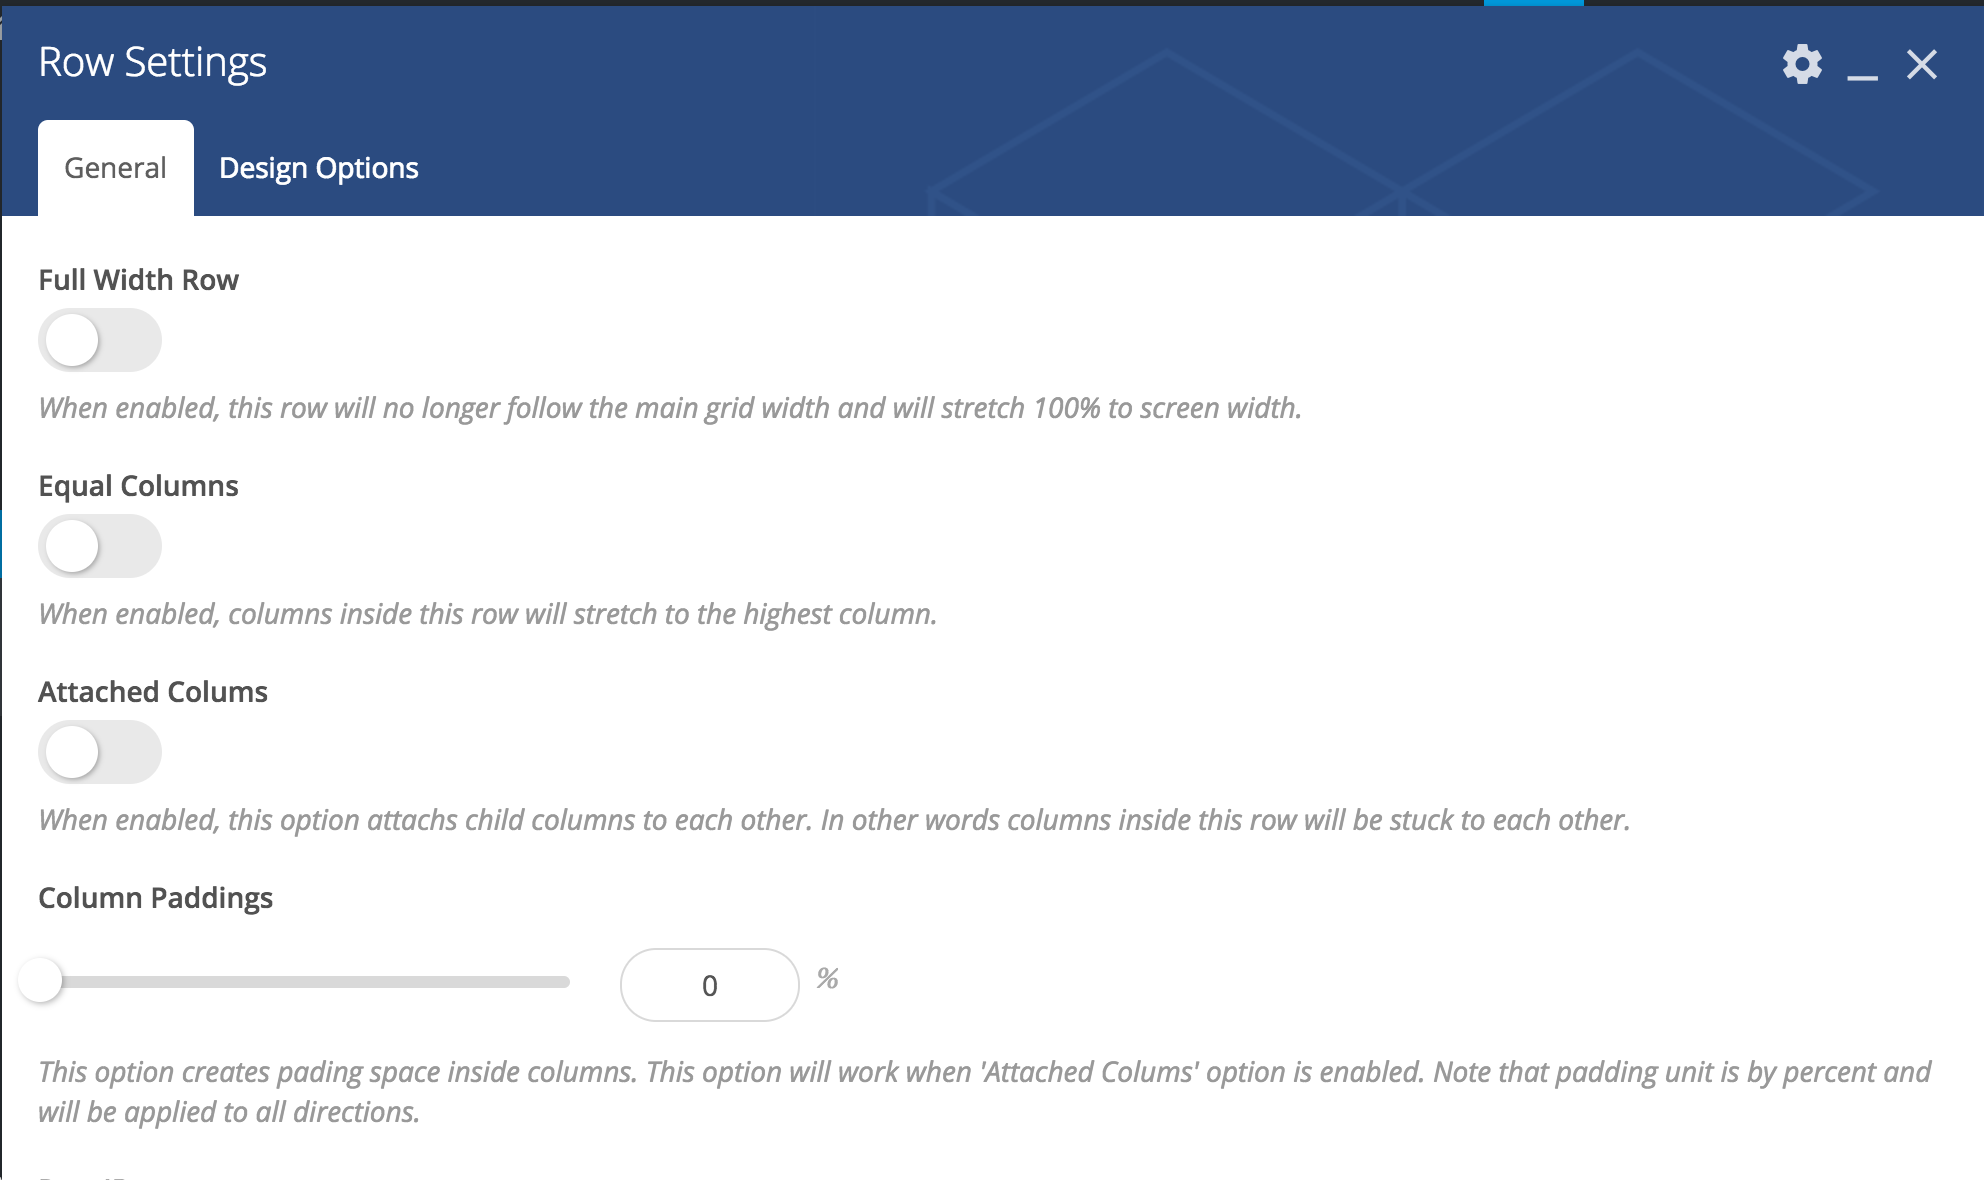
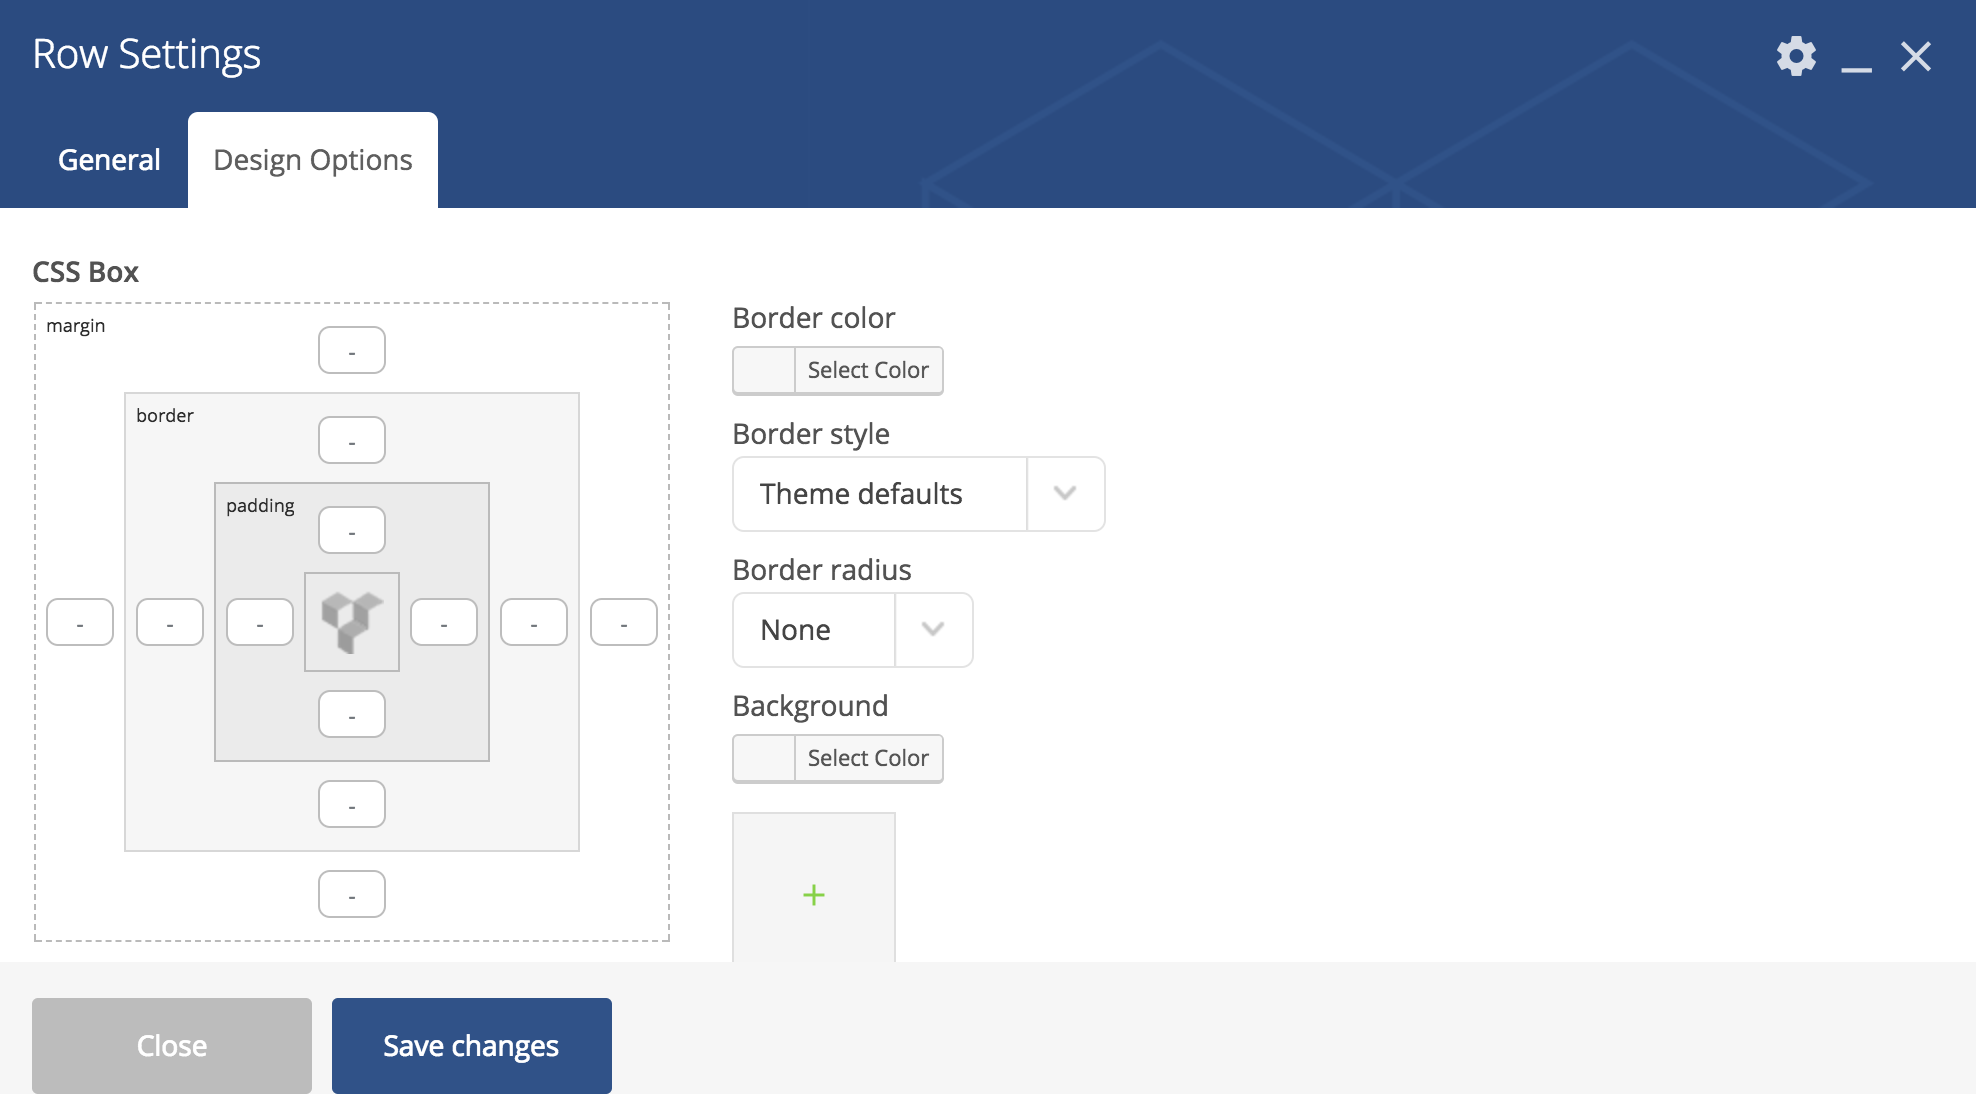
Row
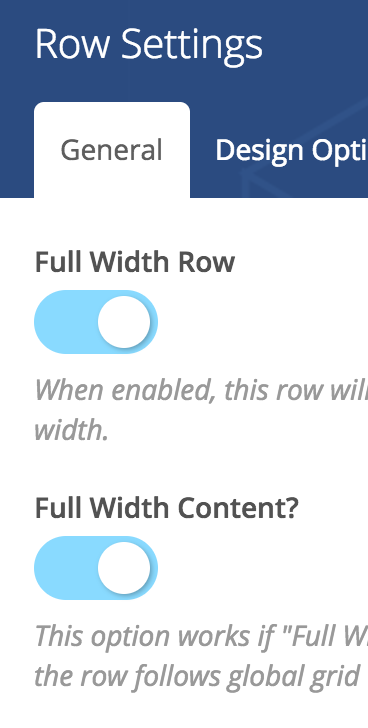
Through the settings, you can decide if you want the row to be full width or not, if the content is full width or not, the background colour, etc…
Page Section
Rows and Page Sections are quite similar except for Page Sections being more advanced.
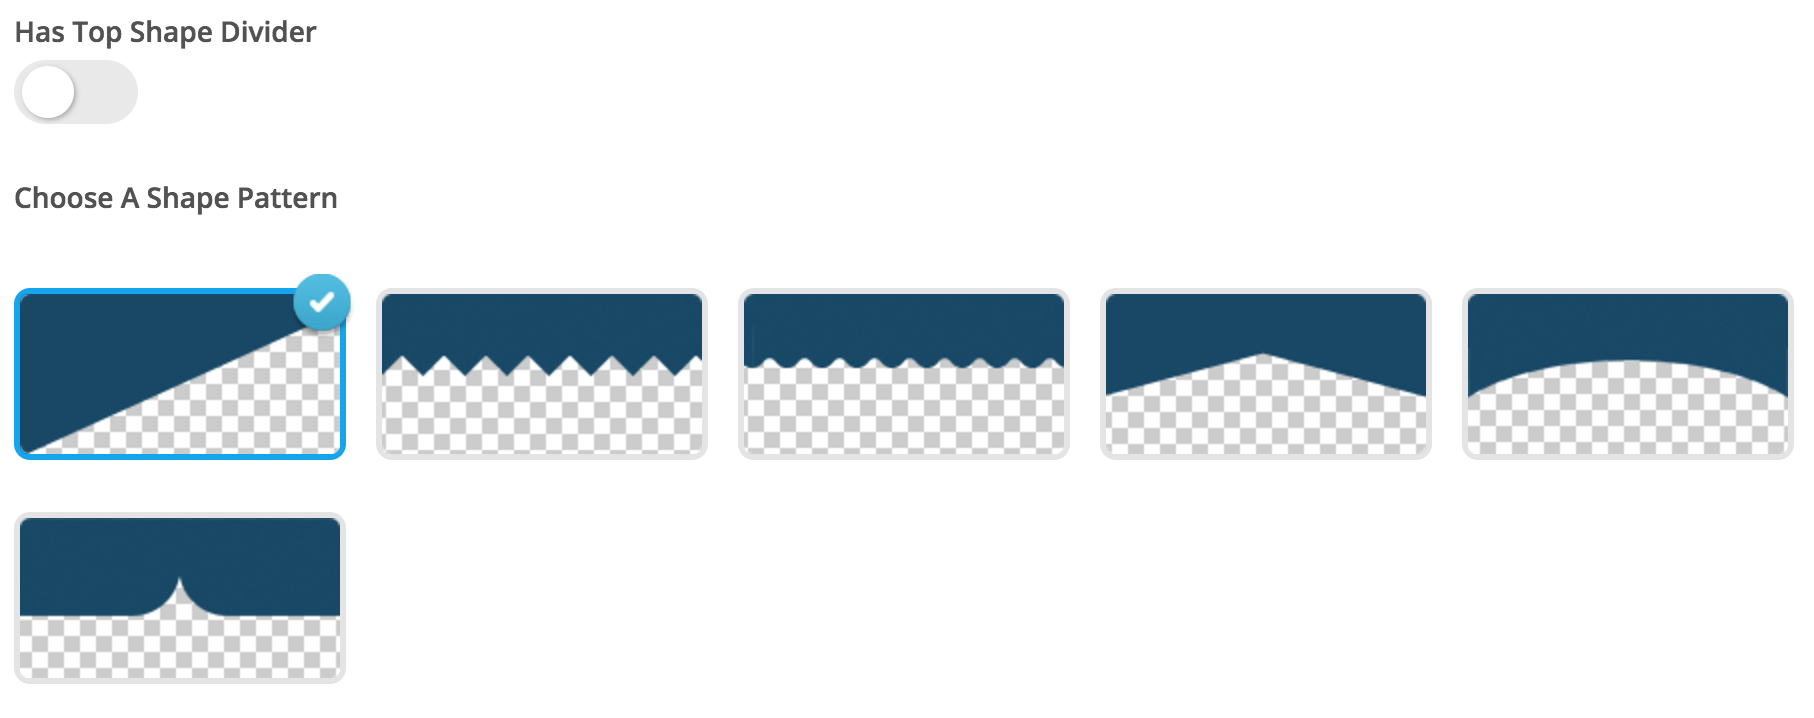
2 noticeable differences are the layout, and the shape divider.

Columns
You can create columns in a lot of different ways. By default, a few options are suggested, otherwise you can use a custom configuration.
Custom configurations are a bit tricky, so be sure to know what you are doing. the total always needs to be equal to 1, while each column must be a multiple of 1/12.
e.g.:
- 1/3 + 1/3 + 1/6 + 1/6 (4 columns, 2 of 33%, 2 of 17.5%)
- 1/4 + 1/2 + 1/4 (3 columns, the one in the middle being twice as wide as the others)
- …
![]()
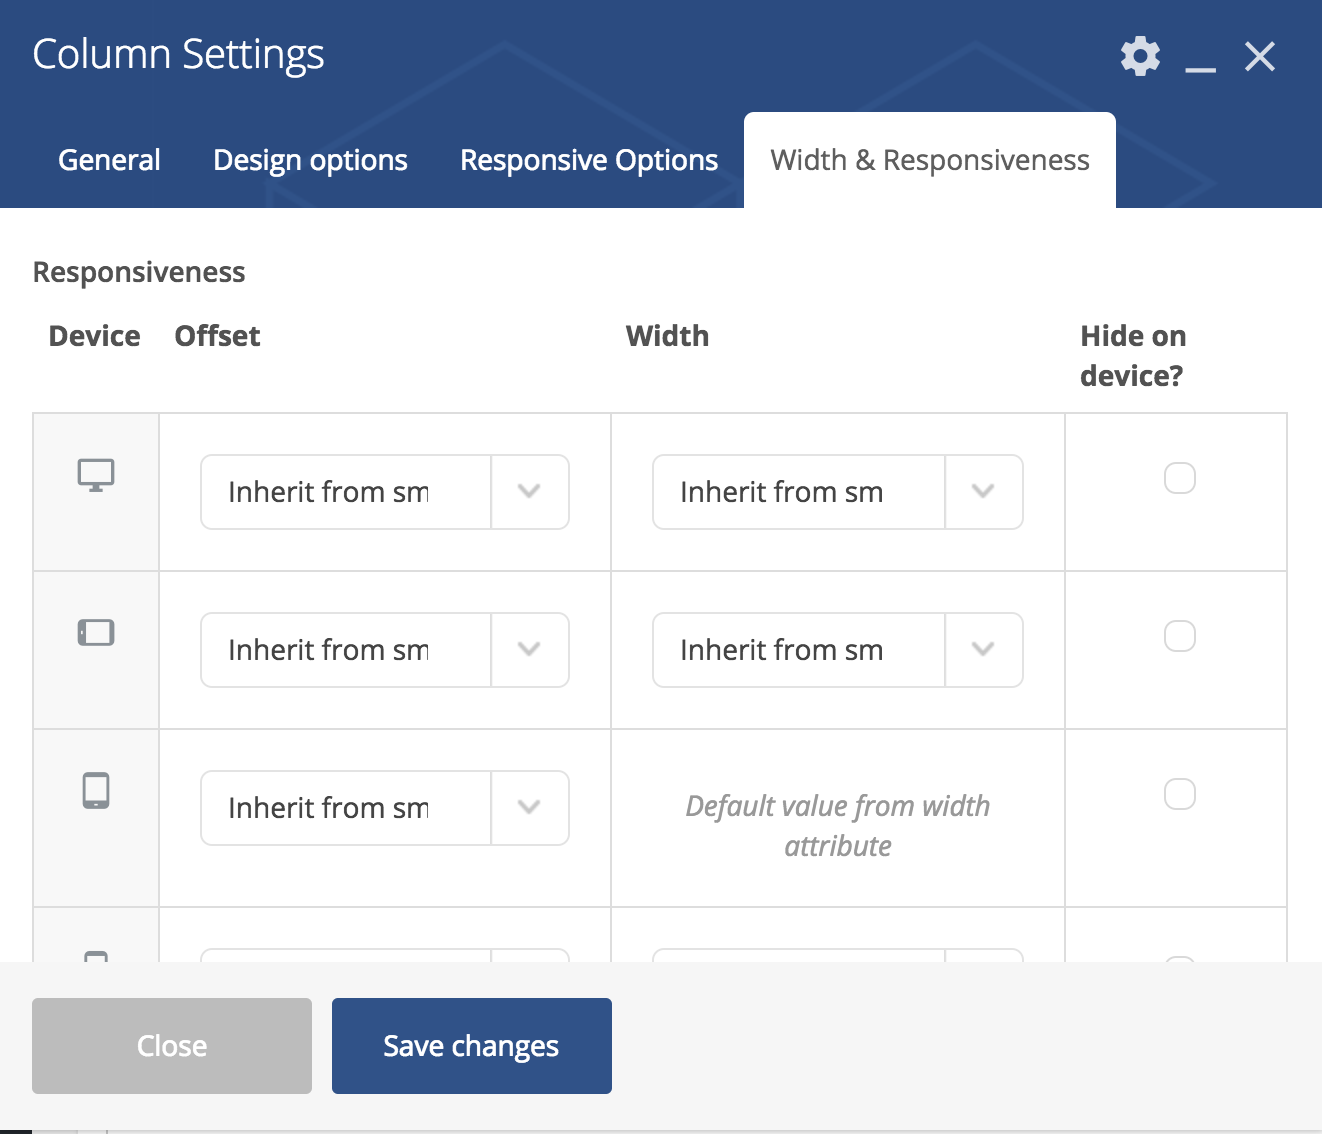
For each column, you can decide a few settings. Normally, you would not touch these, however in some cases you might want to get your hands dirty.
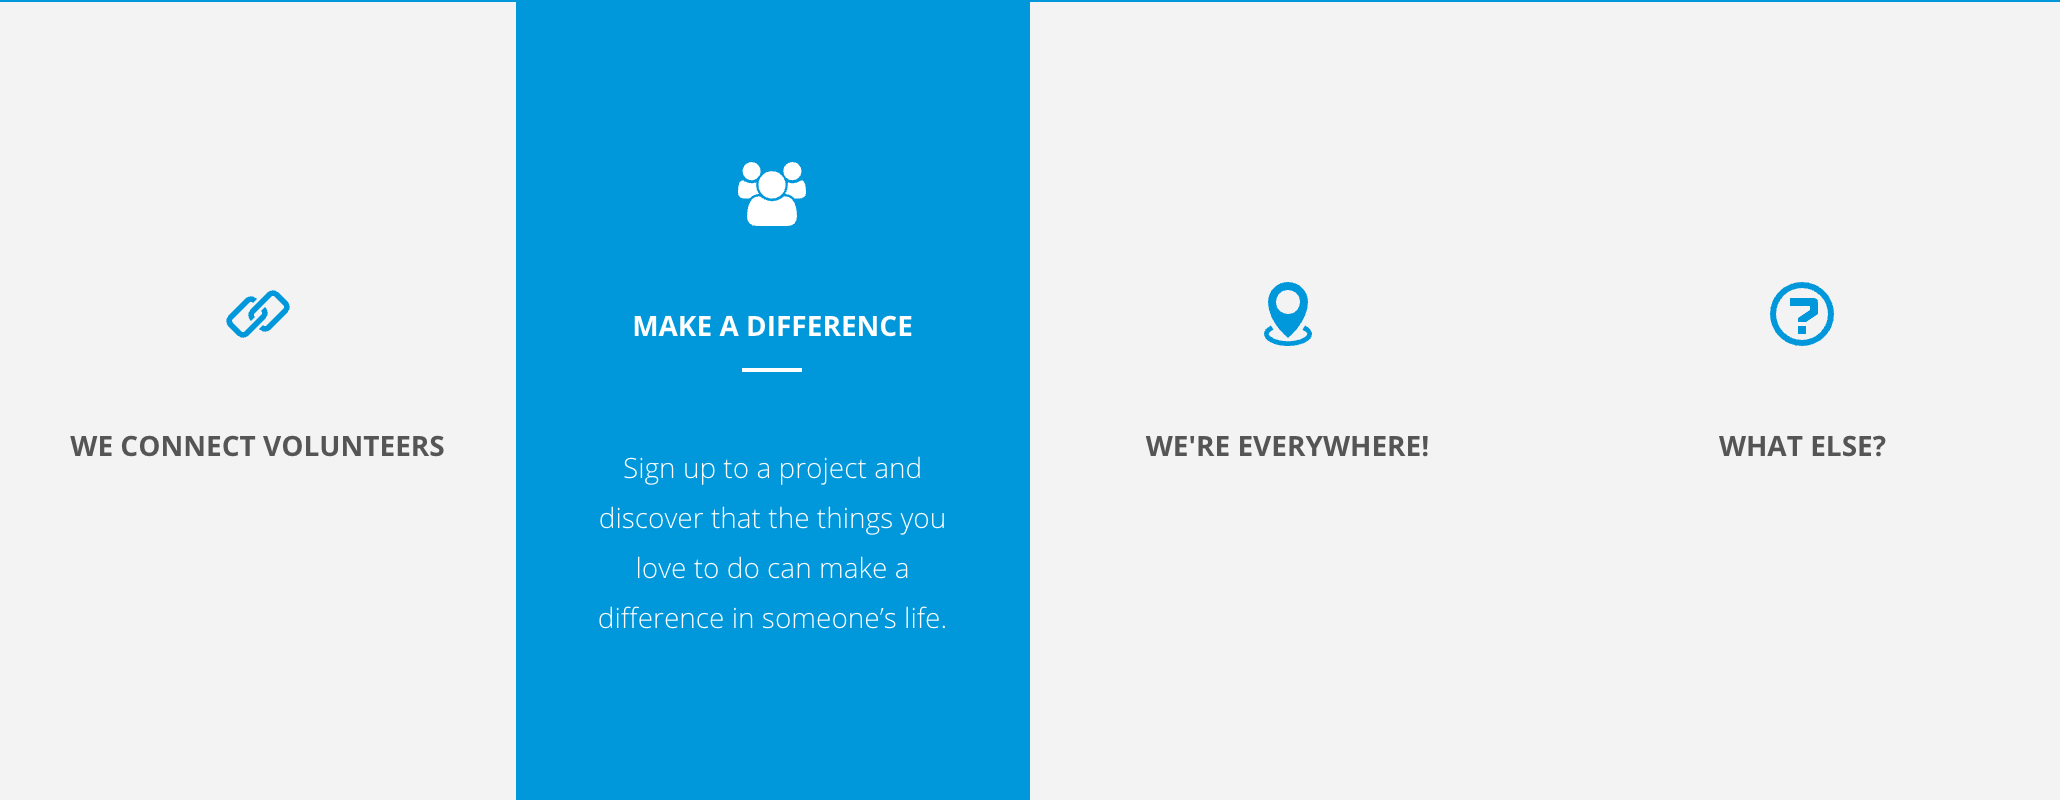
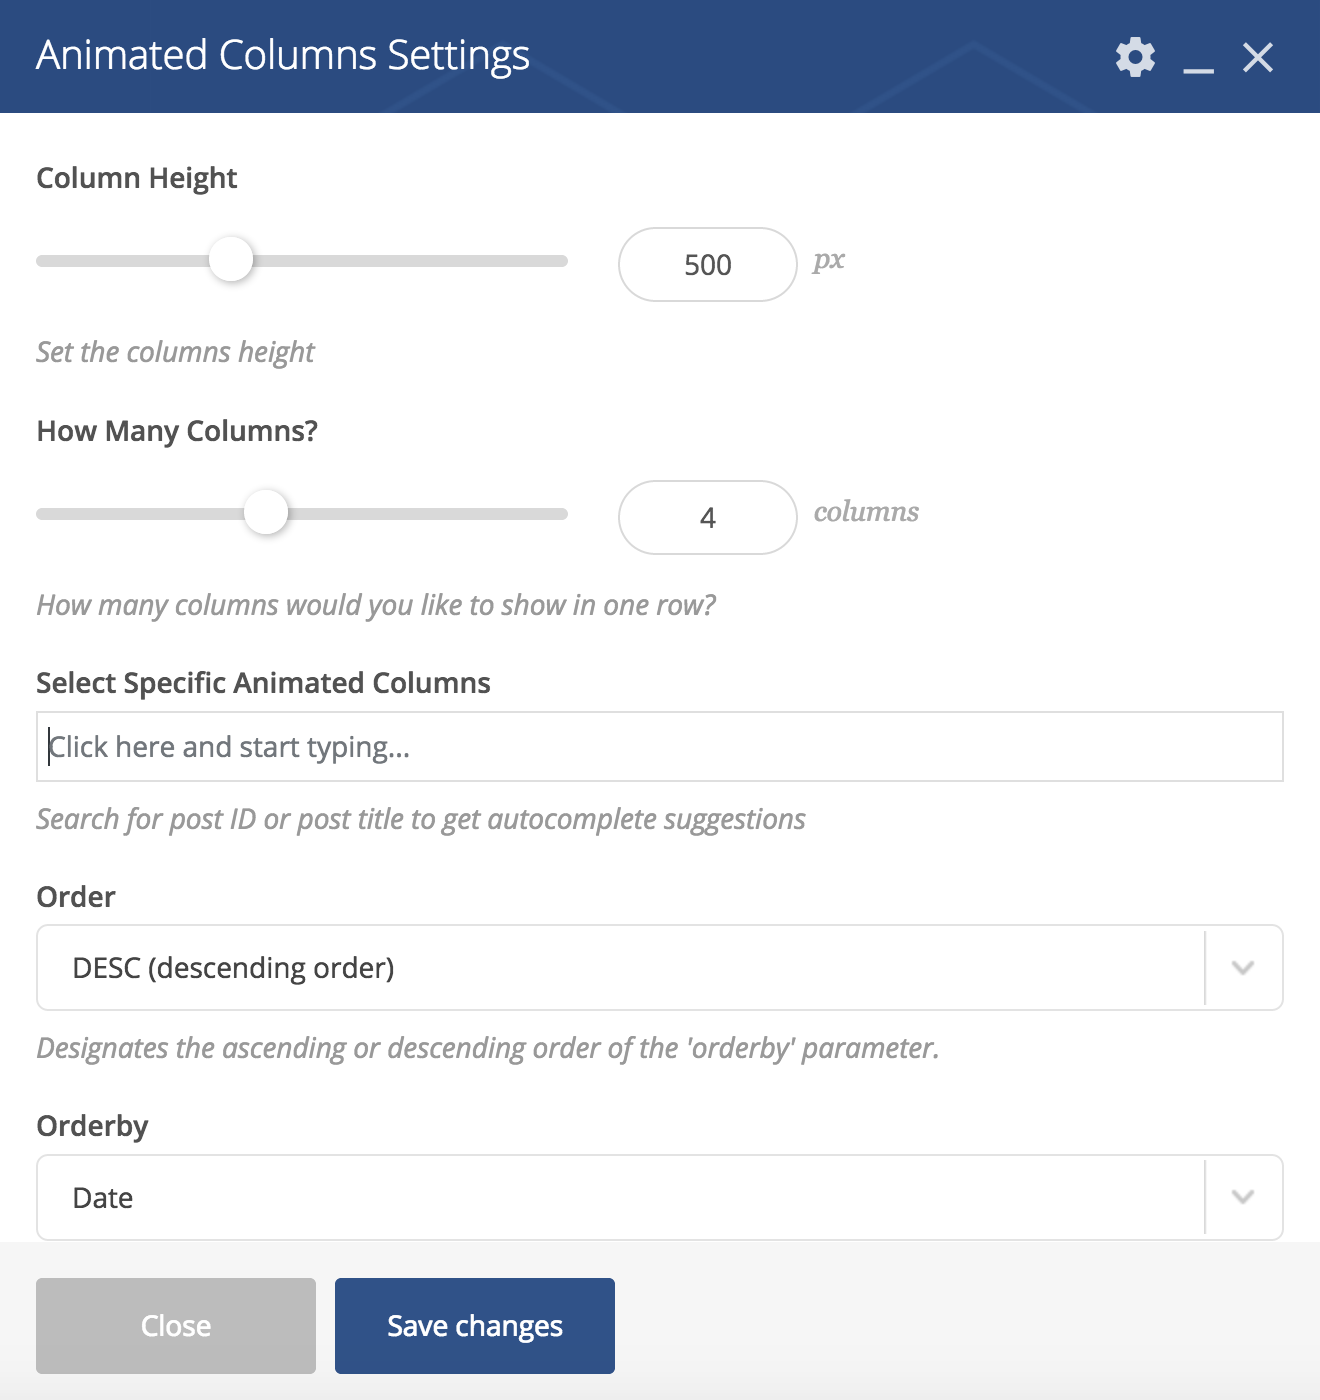
Animated columns are the columns with an icon, title and description that you see on the default homepage of your new website. As their name indicates, they are columns that have an animation (on mouse over).
Like posts, their content is managed in a specific section of the admin.
Content
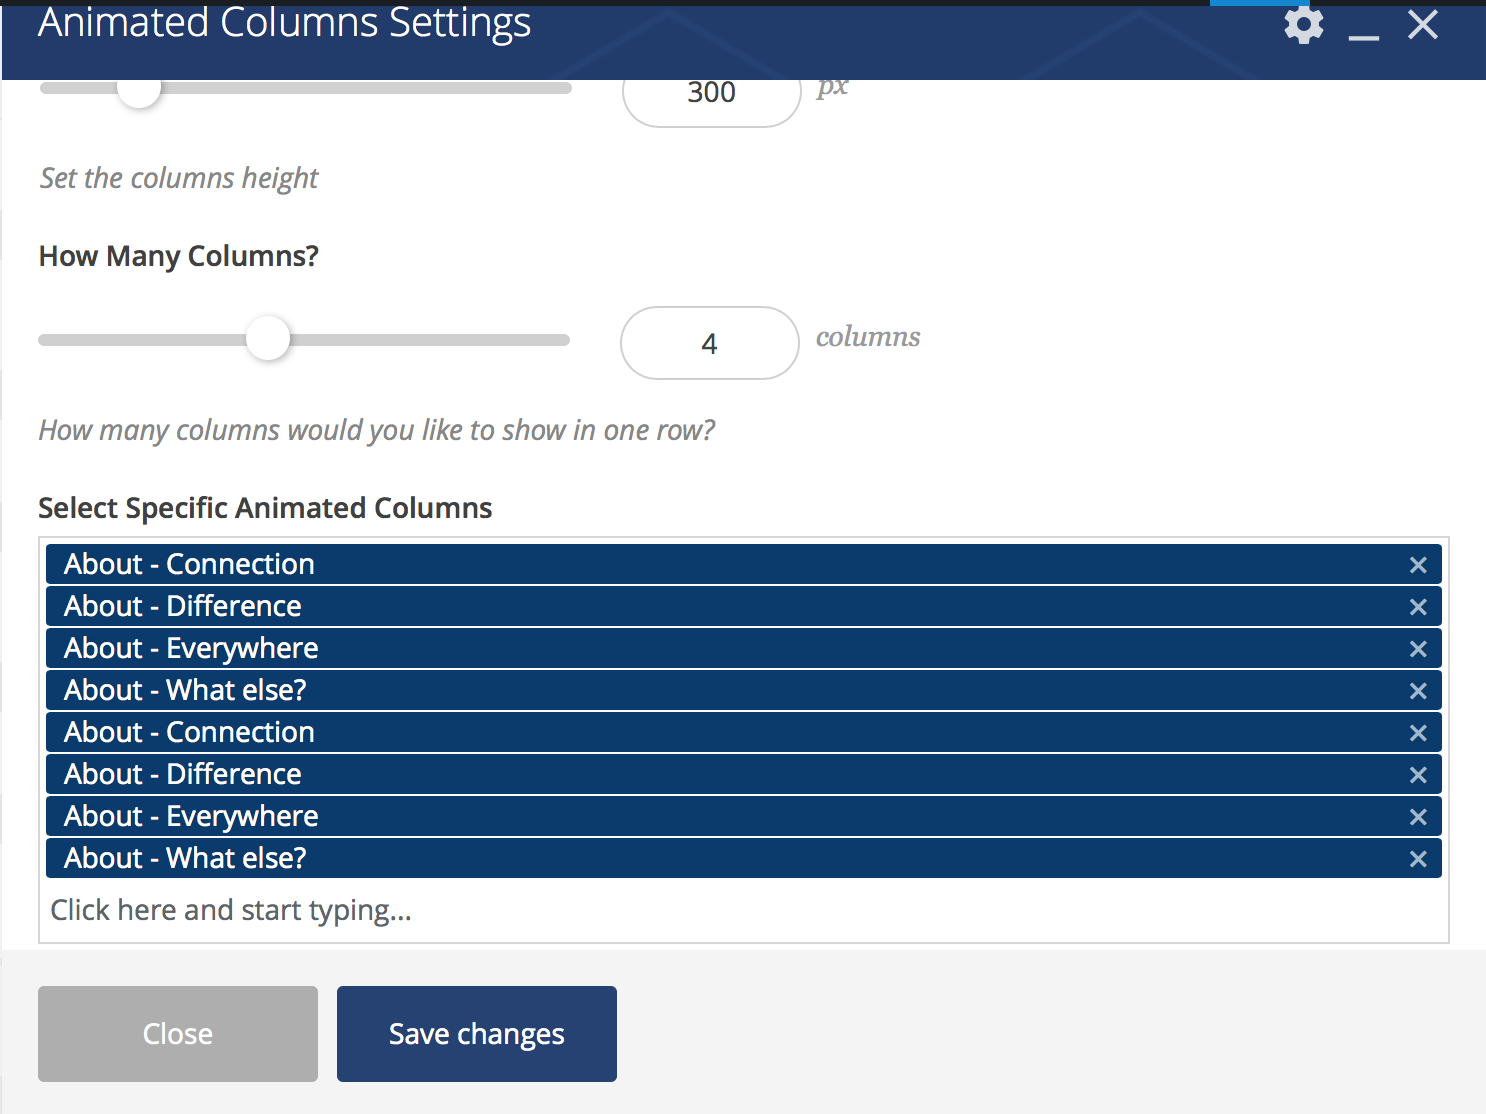
Go to Animated Columns in the left menu, then either edit the column you want to edit, or add a new one.
Here are the fields to fill:
- Title
This is the title of the record for admin purposed. It is not displayed publicly. - Icon Type
Either Font Icon or Upload Image. Font Icon means an icon selected within the available icons of the theme. - Add Icon Class Name
In case of Font Icon. Copy the class of the Icon you would like to use for this column.
or Upload Image - Column Title
This is the title that will be displayed publicly. - Column Short Description
Description displayed on rollover. Keep in mind this is a SHORT description. - Button URL
If you want to add a link, insert the URL here. Or leave blank. - Button Text
If you want to add a link, insert the text of the link here. Or leave blank. - Button Target
By default, the target will open in the same window. In some cases you might want to open it in a new window. - Order
By default, the post order is 0. It can be useful to define it for displaying purposes.
Once the fields are filled, do not forget to publish the post.
Display columns in 1 colour
You have your different Animated Columns but now, you need to display them on your website. If you want to have them all in the same colour, here is how.
On your content page, create a new row (as explained in Rows / Page Sections). For design purposes, it is advised to make the row and content full width.
Once your row is ready (general settings like background colour, padding, …), add the block Animated Columns.
The following screen will open, where you can define the layout settings and select the elements to display.
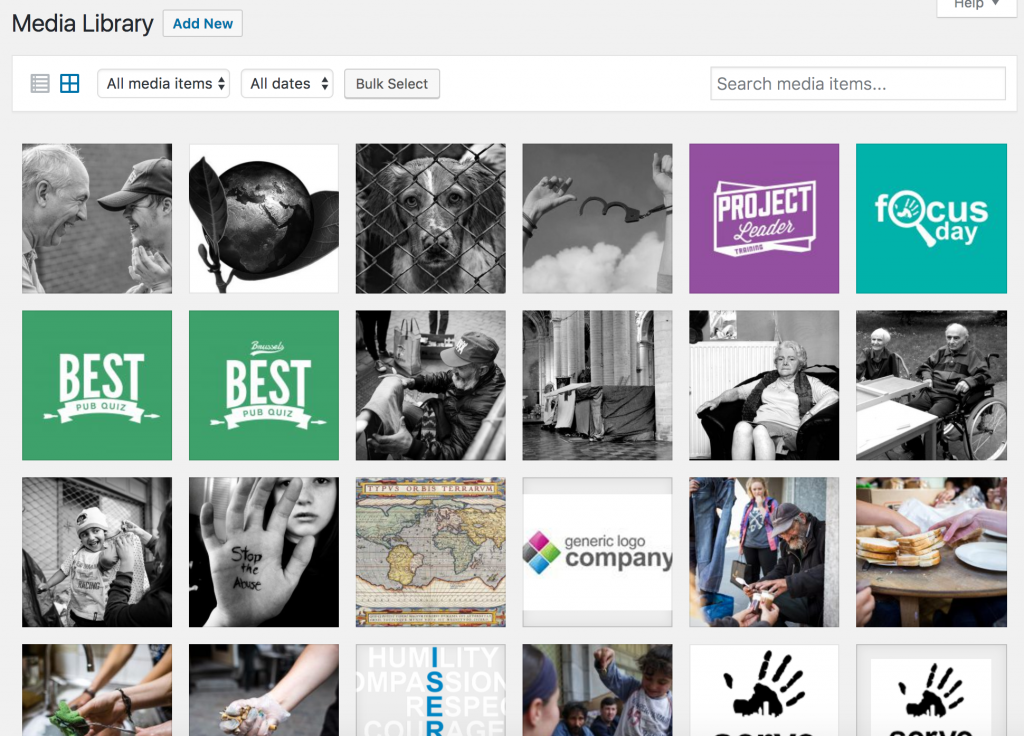
As you may have seen by now, when you edit a post, event, page, … you can add an image / video / file document to it. The Media page allows you to have an overview of all the files that have been uploaded to the website.
You can search for them, edit their title, etc. A good title will make it more easily searchable than a random file name (e.g. if you upload a picture that you took from your Facebook page, think of renaming the file beforehand, in a name that describes the content, like “free-hug.jpg” rather than “523t234523452423.jpg”. This way you will be able to search for it later if you want to insert it in another place.
In short, YES! Events can be posted anywhere.
Events, like any other post type, can be included wherever you want on the page of your choice in WordPress.
Situation: You are organising a Team Building activity for Company A, which will have 3 different projects and would like to offer them the possibility to register online via the Events Manager. However, you do not want everyone to see the said projects.
One possible way:
First, create a Password Protected page on which you will add the Event Calendar shortcode (pretty much the same as the default Volunteer page).
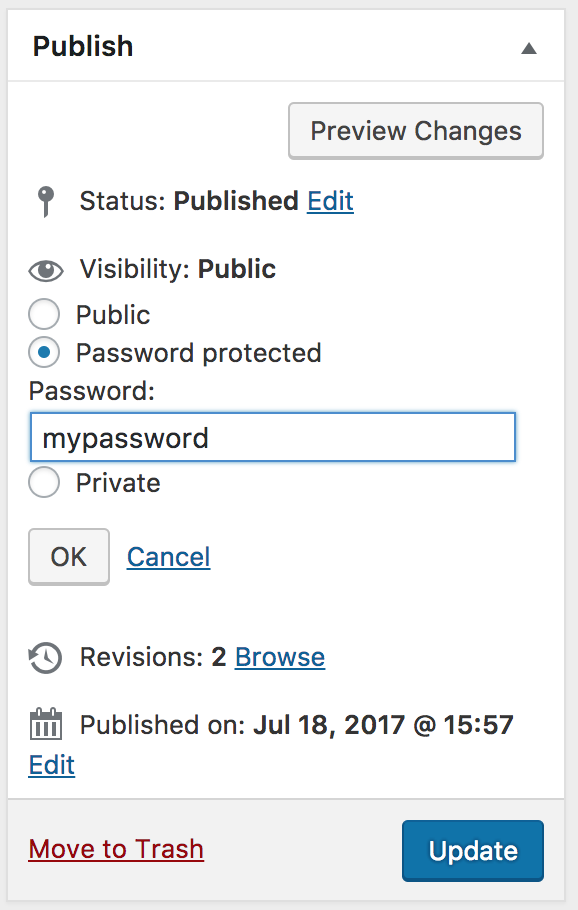
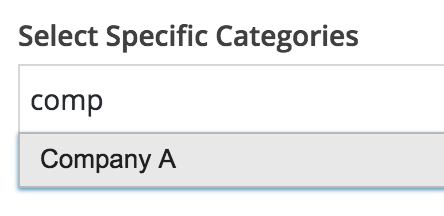
In the settings of the Event Calendar shortcode, select the category of the “private events” (in our case, Category A).
Save and publish it, and send the link to the page to the company.
Note: If you are not using Event Categories, to do this method, you would need to first create Event Categories, but as well to modify the Volunteer page so that it only shows the “public” event category/ies.
Alternate method:
In some cases, you might find easier to simply create a form with a dropdown field to select the project, and include this form in a password protected page.
In case your website doesn’t have a Data Protection Policy page, you definitely need to create one to comply with the GDPR regulation. Why do you need it if you are not located in Europe you say? Because it applies to any website / company / organisation dealing with European citizens, even one. So if one European citizen visits your website, you need to be ready!
Let’s dig into it…
First go to Pages > Add New
Give it a title (e.g. Data Protection Policy).
Copy/paste the following content in text mode (see below):

Now go back into visual mode and edit the parts that need editing (e.g. the name of “Serve the City Cityname legal status”, if you use a different payment processing method, or a different newsletter system, …).
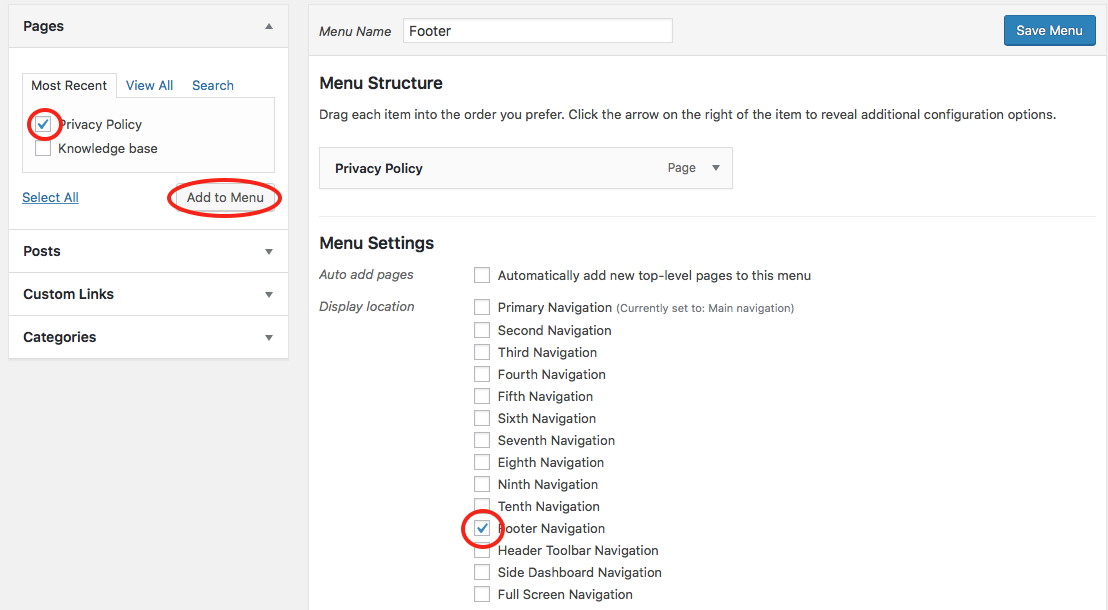
Now that your page is published, let’s add it to the bottom navigation
To do this, go to Appearance > Menus.
If you don’t have one yet, create a new navigation for the footer by clicking “Create a new menu”.
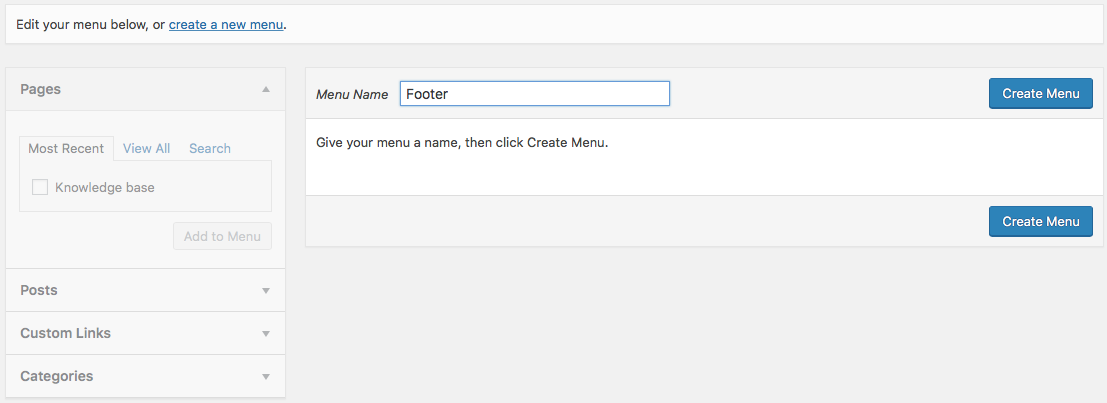
Enter the name (e.g. “Footer”) and click the button Create menu.
Now, select the newly published page, add it to the menu, indicate the menu is located in the footer, and save the menu.
You’re all set!
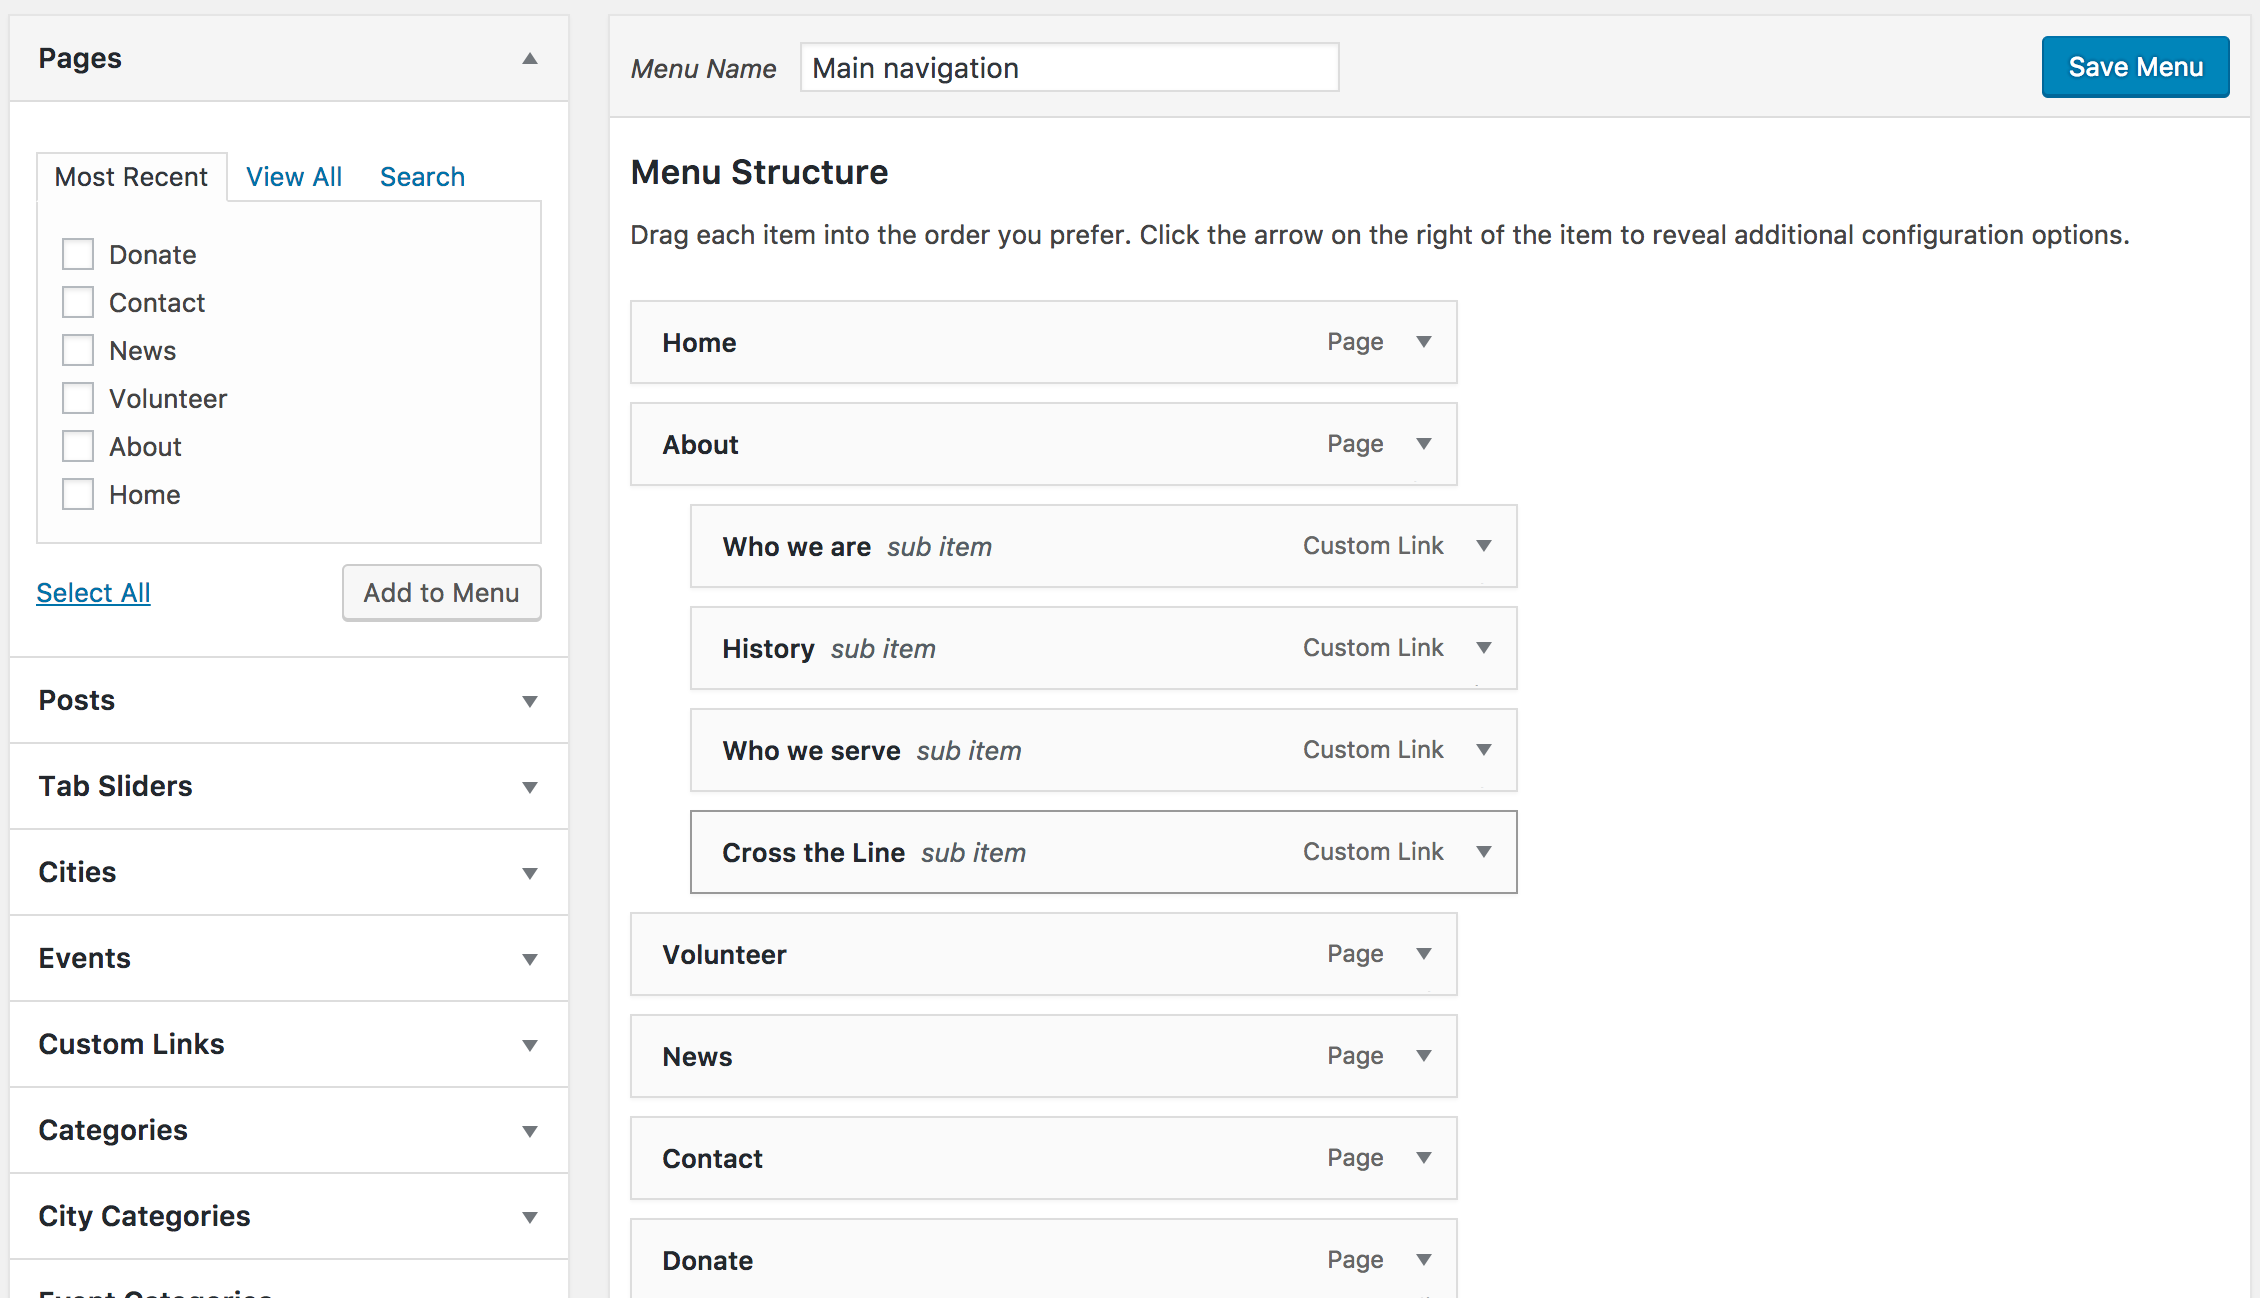
You have created a new page, but it is not appearing in your navigation menu. No need for panic, elements are not automatically added to it.
- Go to Appearance > Menus
- Select the element to add on the left
- Position the element where it should go by dragging it and dropping it in its place. You can position the element as a submenu option by moving it a bit on the right.
With GDPR, it is crucial that you get the consent of the people when they fill a form and send you data. If your forms do not have one already, it is important to add a consent checkbox to them.
First, go to Forms, and select the form to edit.
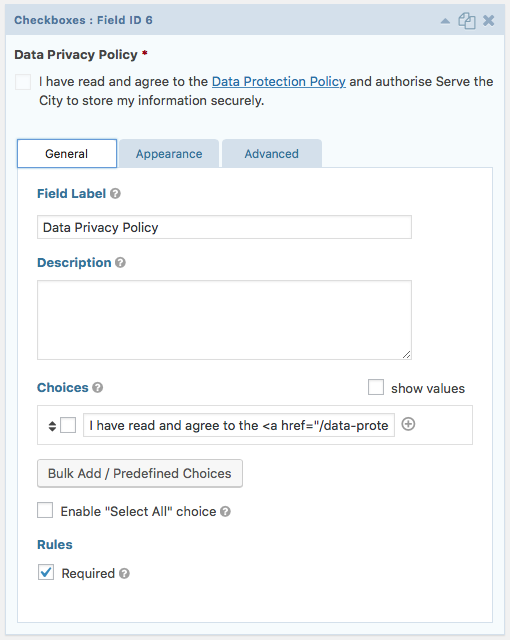
On the right side, in Standard Fields, select Checkbox.
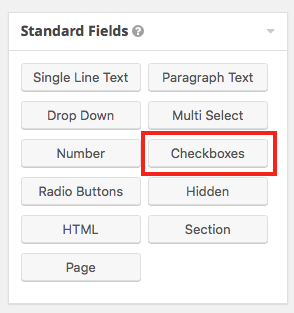
A new checkbox field appeared in your form like below.
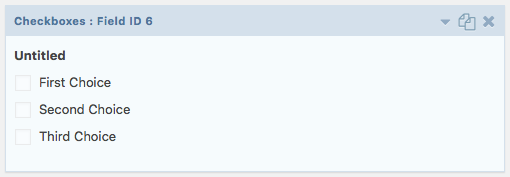
Click on the arrow, and modify the field label to “Data Privacy Policy” (or similar), remove choices 2 and 3, and in the first choice, insert the following (or similar):
I have read and agree to the <a href=”/data-protection-policy/” target=”_blank”>Data Protection Policy</a> and authorise Serve the City to store my information securely.
The “href” parameter should correspond to the address of your data privacy policy page. The “target” parameter indicates that we want this page to open in a new tab/window so that people can read the policy without loosing the form information.
Make sure the field is required.
It should now look like this:
To create a link that will open the page to a specific part of the content, the first step is to create what we call an anchor.
You can create an anchor by giving a unique ID name to the row or page section you would like to link to.
First open the options of the row or page section ![]() .
.
Then fill the ID field with a unique name (without spaces or special characters).

ID Field for a row

ID Field for a Page Section
Once this is done, let’s go to Appearance > Menus.
On the left side, go to Custom Links, and fill the fields accordingly.
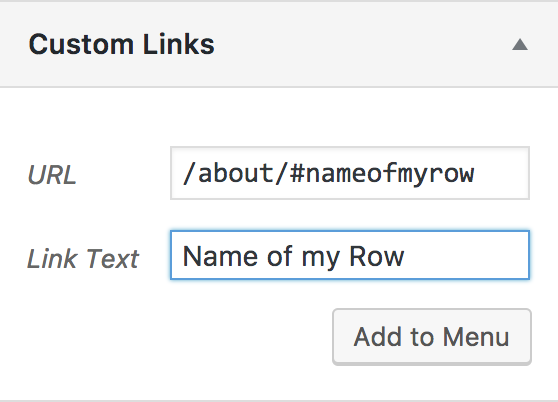
Make sure to copy the full link in the URL, either including the domain, or at least from the root. For example, if the final page is https://www.servethecity.city/volunteer/weekly/#register, you should either copy the full link like this, or /volunteer/weekly/#register.
Note: When you are getting your website ready for publishing, your website is available under a servethecity.net/cityname type of URL. Once it is published, it may be under a custom domain name. Please make sure to update your custom links.
Yes!
Mailchimp has a pretty detailed documentation of how to get your mailing list GDPR compliant and it can be found here.
In a nutshell, but please do read the guide entirely, you need to do the following:
- have a privacy policy in place. (see GDPR – How to create a Data Protection Policy page?)
- edit your form to add the consent checkbox. (see GDPR – How to add the consent checkbox?)
- sign the Data Processing Agreement with Mailchimp if applicable.
- create a new field in your list called GDPR (or anything similar) so that anyone who registers now is added to that group as they give their consent. (see below).
- modify the form’s Mailchimp feed to add people to that group. (see below).
- for European cities or European subscribers, send them an email asking them to opt in to your newsletter again, giving the consent.
- from now on, only send newsletter to people who gave their consent (in case of European cities) or to anyone except European citizens who didn’t give their explicit consent (for other cities). This last option is trickier and many companies have decided to apply the same rules to their customers wherever they are from, as it is easier to maintain the same set of rules.
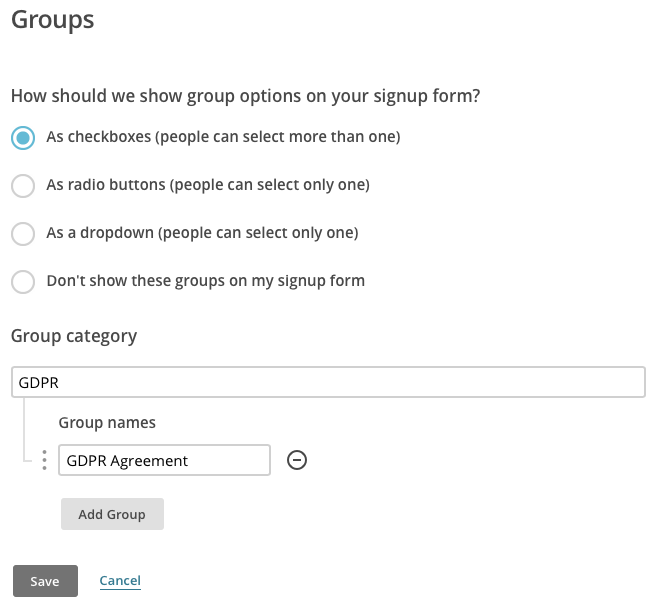
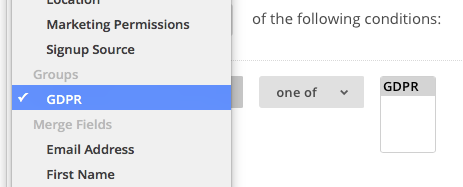
Create a GDPR field and a GDPR group in Mailchimp
Firs of all, if you have read the Mailchimp guide linked up here, you notice that our approach is slightly different. Indeed they have set up a “GDPR” check box that you can activate for forms. Unfortunately, it is not possible to modify this data from the website, meaning we cannot tell mail chimp from the website that the person has indeed given his/her consent. Which defeats the point.
This is why we are creating a field / group.
First, log in to Mailchimp and select the list you want to modify.
Go to Manage Contacts > Groups
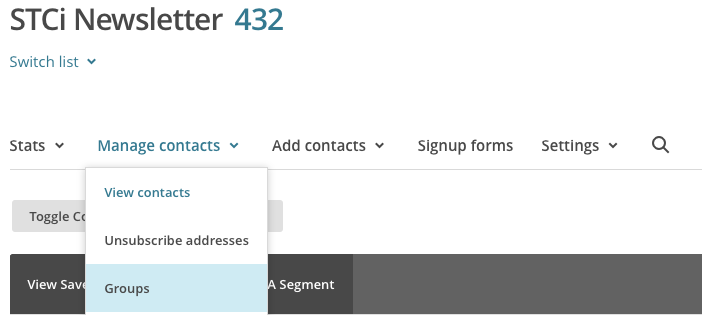
Create a new group like shown below, then save.
Now let’s create a Segment that will only show you people from that group, and another segment showing you people not in that group. This allows you to select who to send your newsletter.
Go to Manage Contacts > View Contacts, then click on Create a segment.
Create with the following options, click preview, then DO NOT FORGET TO SAVE by clicking “Save as segment” on the top right. Name it GDPR.
Repeat the step with the following data. Name it Not GDPR.
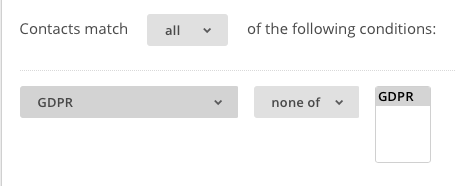
You now have an easy way to distinguish between the people who gave their consent and the ones who didn’t.
Now we will see how to make it happen that the web form updates the info on Mailchimp.
How to modify the form’s feed to add people to the group?
Let’s first go to Forms, then on the form that you have linked to mail chimp (usually Newsletter) go to Settings > Mailchimp. You should see a mail chimp feed. If not, refer to How to configure your MailChimp account on the website?
Edit the feed.
Because your website is connected via API to Mailchimp and because you created the GDPR group using the instructions above, you should now see a group option with the GDPR (or whichever name was given).
Check the box and mark it as Always, as the consent is mandatory to submit the form.

Save by clicking Update settings.
You are all configured. You only need to get your existing base of subscribers to give their consent by filling the form again.
Get subscribers to give their consent
The easiest way to get your existing subscribers to give their consent to the Policy is to send them an email with a link to a dedicated page for the newsletter.
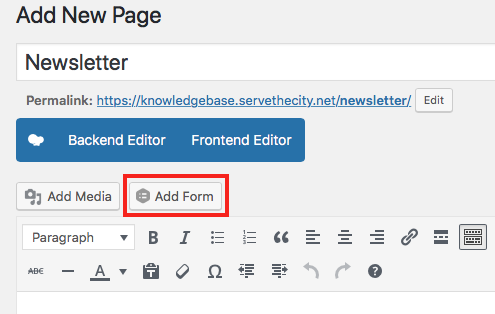
If you do not have a newsletter page, go to Pages > Add new. Name it Newsletter, and insert the newsletter form. Publish the page.
Now create a new campaign in Mailchimp explaining why you need people to give their consent. Here is a sample text. Make sure to add the appropriate links where needed.
As you probably heard, on May 25th, a new regulation called GDPR came into action in Europe (and beyond). This new regulation gives stricter and better guidelines on how companies and organisations manage personal data.
We at Serve the City take the matter seriously and have been working hard to be compliant.
In a nutshell, we have updated our Data Privacy Policy [insert privacy policy link], as well as made sure that your sensitive data is encrypted and that we only ask you the data we need to organise our projects.
We have also modified our sign up forms to ask you for your consent, which you might already have noticed.
To make things clear, we will NEVER sell your personal data to any tier.
What do we need from you?
In order for us to keep you informed of our upcoming events, we need you to go to this page [insert newsletter link] and sign up for our newsletter again (yes, again. We know, it’s a pain, but it is really fast).
It is really important that you do so if you want to keep receiving updates from us.
Go to the newsletter sign up page [insert newsletter link]
Thank you for understanding and trusting us with your data.
This is it!
You need your MailChimp API Key to configure your form. Yes but where is it?
First, go to www.mailchimp.com and log into your account.
Under your profile (top right), go to Account.
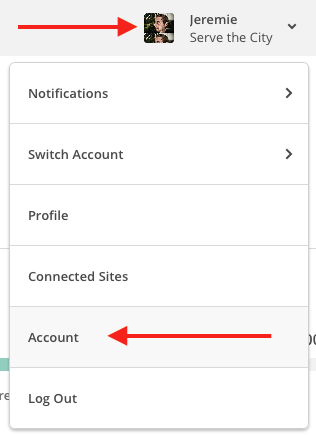
Then, go to Extras > API keys.
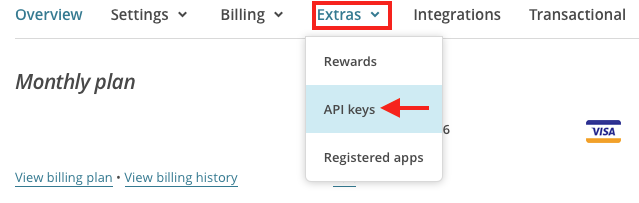
Click on Create A Key

Then, simply copy the key, and paste it where needed.

Unfortunately at this stage it is not a feature of WPML for which we depend on the translation.
Note that this is different for Salesforce, which we recommend you using if you have many activities.
Sometimes, it could happen that you do not see any of the fields to translate. It can happen for only one page or for everything.
Try to save the original page again (e.g. English). Make sure you do not check the box.
If this doesn’t fix the problem, please contact us.
Problem:
You are creating events in e.g. English, and translating them into e.g. Estonian. You are also creating events in Estonian and translating them into English.
On the English site, all events originally created in English are showing but not the ones created in Estonian. On the Estonian site, only the events created in Estonian are showing.
Solution:
Try to save the translations again. If it does not work, contact us as something may be wrong in the configuration of the multilingual system.
Example: We give the possibility to sign up for the newsletter in either Dutch or English. So in Mailchimp we have two sign-up lists: a Dutch and English one. During sign-up we request to make a choice for NL or ENG. I am trying to set up the link to Mailchimp so the NL sign-ups end up in the Dutch Mailchimp list and the ENG sign-ups in the English mailing list. How am I able to configure this?
Solution: One easy way to address this is to add a field (dropdown, radio button or checkbox) with the 2 (or more) language options, so that people can select one (or more if you want people to be able to register to all the languages).
Save your form and go to the form’s Settings > Mailchimp page.
If you don’t have a mail chimp feed yet, you will need to create one (actually one per language). If you already have a feed, edit this one and create the one(s) missing afterwards.
Here’s how you will make your Mailchimp feed be attentive to the language:
 What changes from a normal, monolingual, newsletter is the last part: Conditional Logic. With this part, you will separate the entries according to their language.
Please note that the Double Opt-in checkbox is up to your preference, but is on by default as it is safer.
Attention: For Conditional Login to work in a multilingual context, the value of the field used to do the conditional logic should NOT be translated as it will therefore not work with the conditional logic.

Situation: Some STC sites have the language change ‘flag’ in the RH Upper corner (f.i. Brussels). How and where can I set that?
Answer: Go to WPML > Languages, then scroll to Menu Language Switcher and click add.
![]()
Select your main navigation and make sure the options are as following:
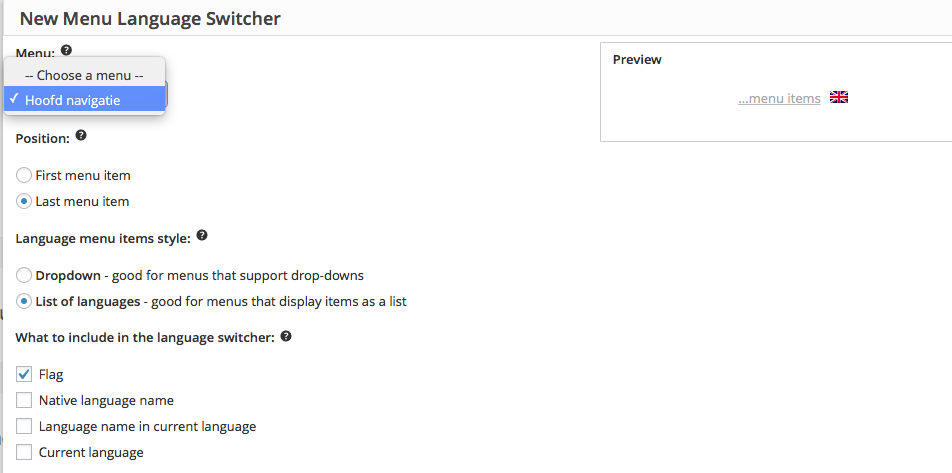
Save and you are all set.
Example: Our project sign-up form has a choice of ’18 years old/above or not’. If not, two additional fields appear, to fill name and e-mail of accompanying adult. On our Dutch site these fields appear if choice is made ‘nee’. On the English site in the advanced field of the form I cannot choose to make these fields available after ‘no’ has been selected. how to set this up?
Attention: For Conditional Login to work in a multilingual context, the value of the field used to do the conditional logic should NOT be translated as it will therefore not work with the conditional logic.
Therefore, to fix the issue, make sure the “value” part is not translated.
If you can come up with the words in your language to create such a design, we would be happy to help depending on our availability at the moment of the request.
If your website is multilingual…
If your website uses multiple languages, please note that the Single Image shortcode (see picture) is not translatable and will be the same for all languages.
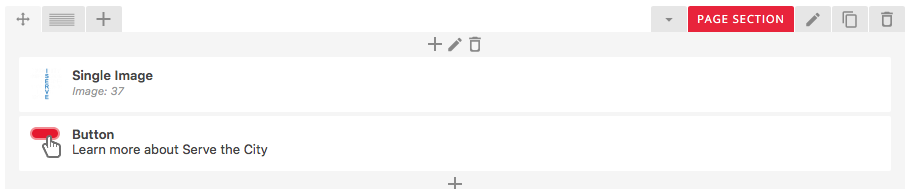
To be able to have a different image in different languages, you will need to use a little trick. Hopefully you won’t need to use it too often as most images are “speechless”. 🙂
First, delete the Single Image element.

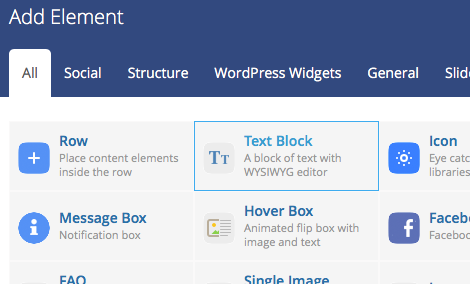
Then, add a new element in the section by clicking the + icon.

Select Text Block in the menu that appears…
Click on Add Media…
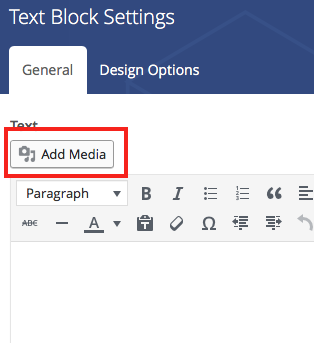
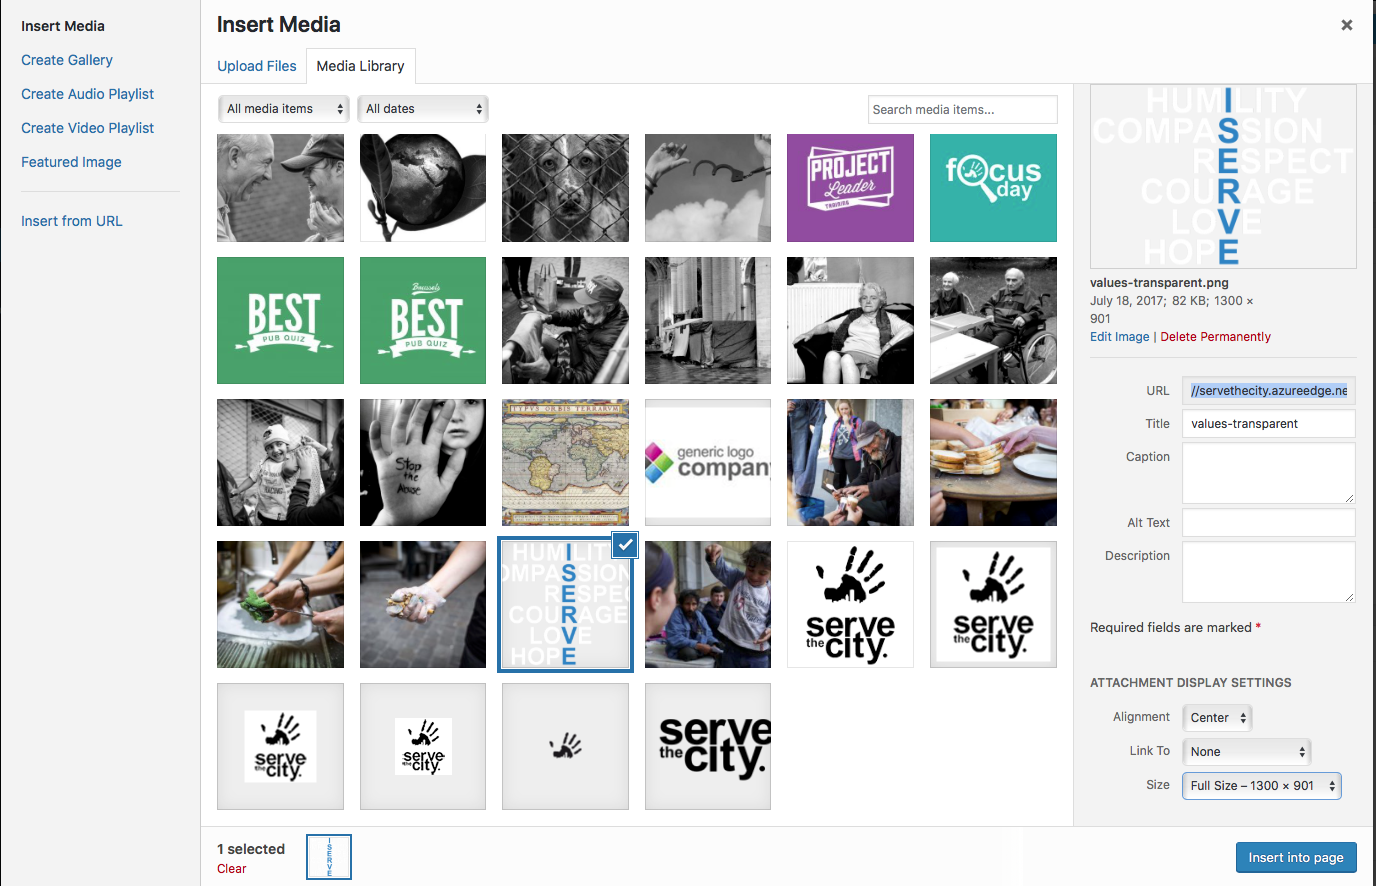
Select your ISERVE image (or upload one by dragging and dropping it on top of the Media interface) and make sure the size is “full” and alignement “center”, then click Insert into page.
Scroll down the Text Block window and put “retina” in the Extra Class Name field, then click Save Changes.
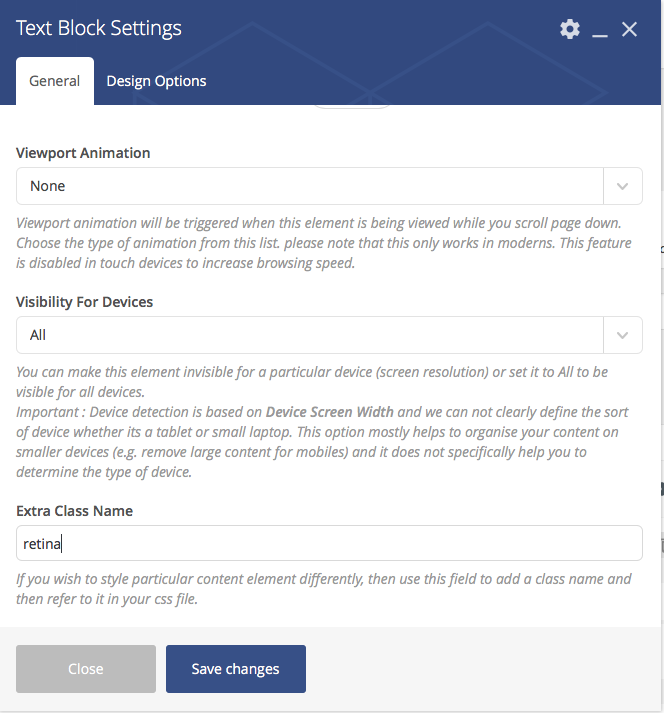
Now, Update your page without checking the box.
Once this is done, you can finally update your translations.
![]()
Scroll the translation editor until you get to the new text block containing your image. If it is not done already, copy the content from the original language (English) to the translation, using the small icon button.
![]()
On the translation box, click on the image, then click on the Edit button that appeared.
![]()
On the new window that opened, click on the Replace button on the right.
![]()
Select or upload your new picture, making sure it is in full size and centred, then save, and mark your translation as complete. Then save the translation.
There you go, you have a different ISERVE image depending on the language.
As of today, it is not possible to move “full” events at the end of the list.
However we are open to find a solution for this if it seem to be a wanted feature.
The colour of the Full banner in the event calendar is based on your main theme colour. It can not be changed.
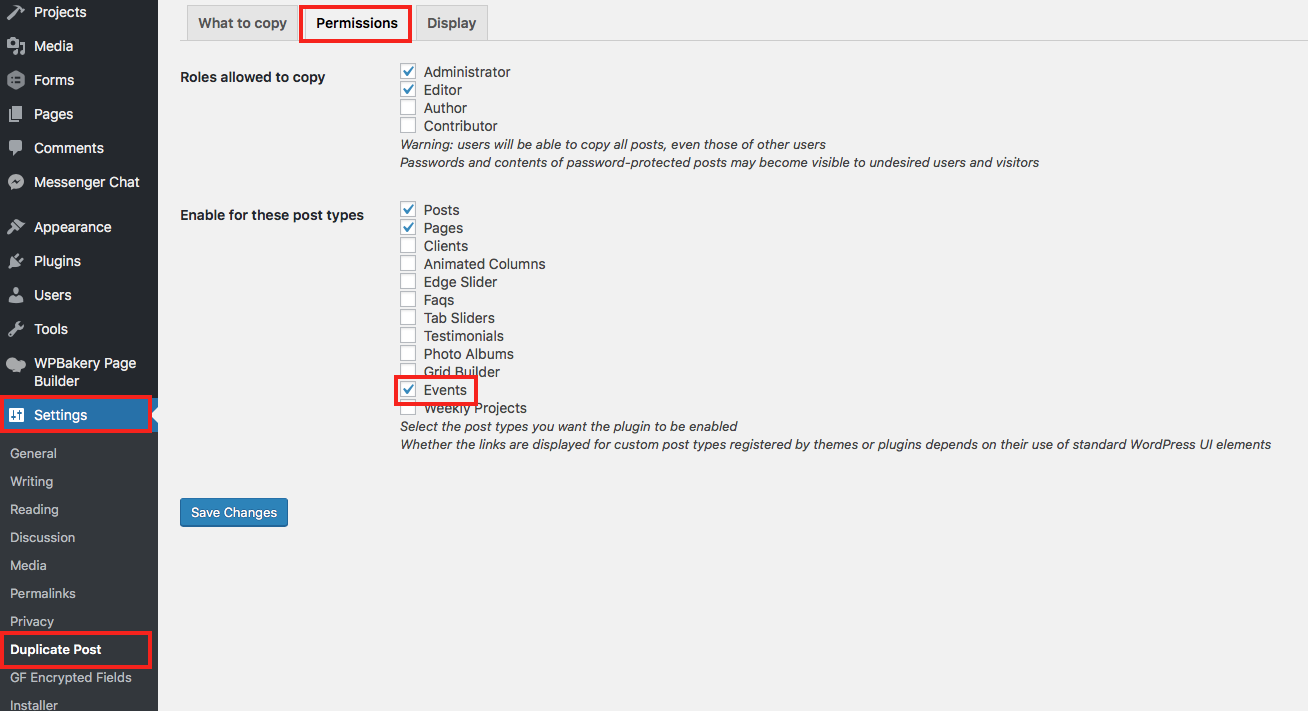
As of July 16, 2018, it is possible to “Clone” pages, posts and more by clicking on the “Clone” option.

On sites created before this date, it is not available by default for Events. However, if you are an admin, you can change the settings by going to Settings > Duplicate Post > Permissions, check the box Events, and save.
This problem can usually happen right when you launched with your local address (from servethecity.net/cityname to stccityname.com for example).
No panic!
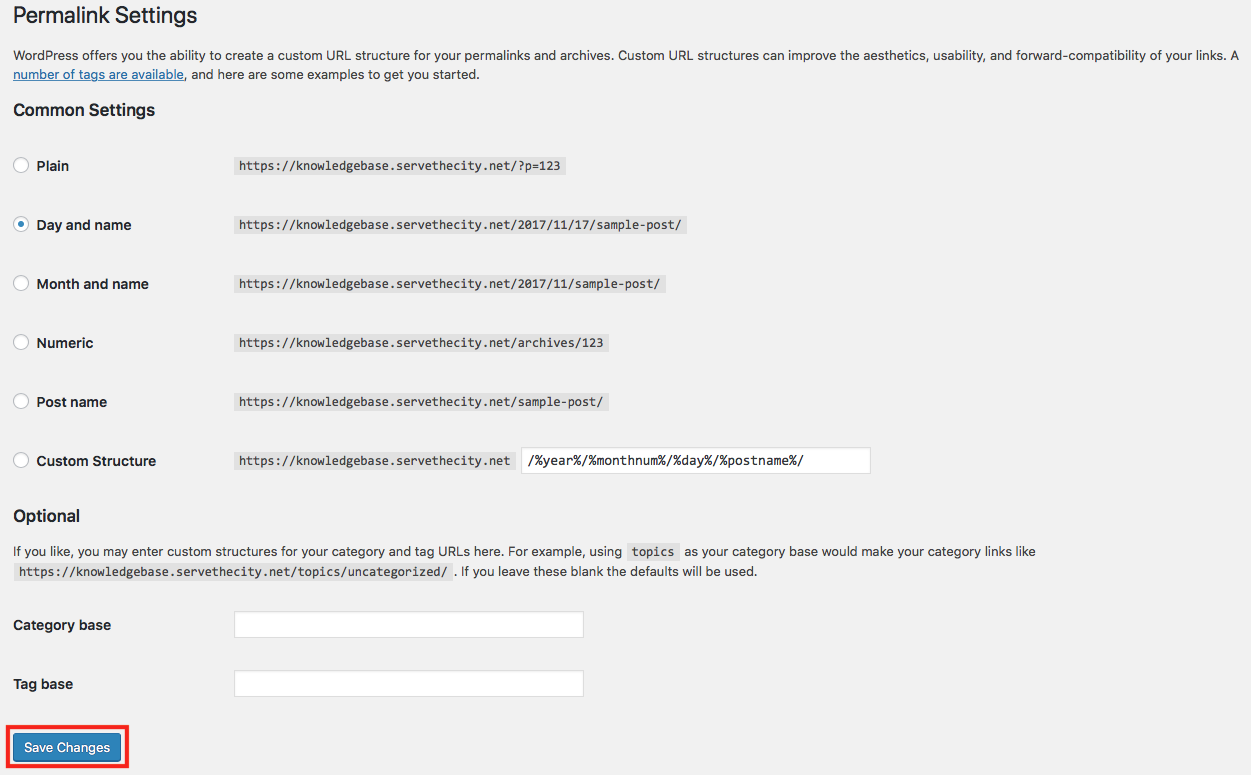
Go to your Admin > Settings > Permalinks, then simply save it again. It will update the links and your events will be available again.
To fix this, go to Appearance > Menus and fix the broken links.
The broken links probably are custom links that include the full URL (including https://www.servethecity.net/cityname/). This part needs to be edited.
If your website is available in multiple languages, make sure to update the navigation in each language.
Problem: You have translated a custom post type such as an Animated Column, a Client, or a Tab Slider (non exhaustive list), yet, it is not showing up on the website in the translation language.
Solution:
Unfortunately, some elements (that we call Custom Post Type or CPT) do not work 100% seamlessly with multilingual content.
To have the Custom Post Type appearing on your translated page, go and edit the page in the main language (e.g. English) and make sure to add the CPT in ALL available languages. For example, if your website is available in English and French, make sure to add the CPT in both English and French on the main page.
Example of Animated Columns where the CPT are added for each language (French and English). As you can see they seem to be added twice, simply because there are 4 elements, 2 languages, which makes 8 elements.
Problem: My submenus in the language X are displaying next to each other while in the language Y, they are under each other. How can I have language X to display like language Y.
Language X
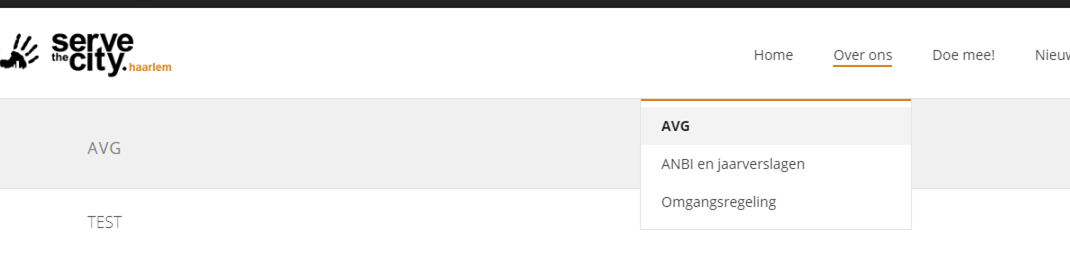
Language Y
Solution: Go to Appearance > Menus. Select the menu which gives you trouble. Hint, if you only see the menu in language Y, check the right top corner for Language X.
Once you are on the correct menu, check the “faulty” main page (in the example above, the page “Who We Are”).
In its options, uncheck the box “Make this a mega menu”.
![]() Save your navigation, the problem is now fixed.
Save your navigation, the problem is now fixed.